This option is only available to the admin user, or users belonging to the admin group. The administrator can perform day-to-day configuration, maintenance and monitoring through, this interface.
The Server screen is classified into different sections as described below:
The server configuration details, such as the Java version used, the Elixir directory structure and also the processor information. The directory locations are controlled by command line options, such as -Delixir.home which are discussed in the section called “Java Virtual Machine Configuration”.
The server license indicates what options the server will support. The license is typically stored in the user home directory. If the license file is changed then the server will need to be restarted to read the new settings.
The classpath shows all directories and jar files which are usable by the server. The list includes checksums for the jars for easy version comparison, which also aids in determining whether the Elixir Repertoire Server has been modified, or is using inconsistent or mismatched resources. Some server functionality, for example JDBC access, is dependent on having the right 3rd party jar files installed for your specific database. Often the database vendors produce several variants of the jar, often with the same name, which can make it tricky to troubleshoot JDBC drivers errors.
Elixir Repertoire Server contains a database which holds user and group information,
along with filesystem support. You can backup the database without stopping the
server by choosing the backup option and identifying a directory where the backup
should be stored. It is not possible to restore the database without stopping the
server, as this could affect ongoing requests. In order to restore the database,
you need to stop the server and copy the backup directory to the elixir.db directory
(which is shown in the Configuration section at the top of this web page).
Note that if you want to reset to a default database, you can stop the server and
delete the elixir.db directory (which is called db by default)
and a fresh database will be created next time the server is started.
The pre-requisite for this option is that the user must login with Administrator privileges.
By entering a valid path directory in the field provided beneath Backup to: and
clicking on the Backup button, the backup copy of the database will be located at the
directory the user defined.
To export the DB to a directory, the user will need to define a valid path directory in
the text field. On clicking of Export, exported schema files can then be found
in the directory specified. The schema files consists of dbfs.schema,
quartz.schema and system.schema.
-
Reference schema in current release: On clicking of
Compare, Database Schema Comparison Result page will load. If there are any changes in the schema, the affected keys will be displayed in a table format. If not, a message No changes in schema would be displayed under the specific schema file name. -
Folder that contains expected DB schema: Click on the
Comparewith a valid path directory which contains the schema files in the text input field. If there are any differences in the schema, it will be displayed in a table format in Database Schema Comparison Result page. Else, No changes in schema will be displayed under the specific schema file name.
The status of the system scheduler is shown on this web page. In particular, you can view any jobs that are in progress. You can also review what triggers are loaded by the scheduler and when they last fired and will next fire. You can also force the scheduler to reload the triggers, though this is only necessary if the trigger files have been manually edited. If you have edited the trigger files using the Schedule Designer (which is included in the Remote Designer package) then the triggers will be automatically reloaded by the scheduler when you save them.
Every user of Elixir Repertoire Server should have a unique logon name and password. This gives access to the Server via the web interface (through a browser), through Elixir Repertoire Remote and through the variety of client tools that Elixir provides. Use of specific filesystems and files is granted based on user name and/or group.
To create new user, click on the Create User at the bottom of the Elixir Repertoire
Users list. User name and password are required in order to create a Repertoire user successfully. You
should usually also assign the user to one or more groups. You can edit a user by clicking on the user
name in the list. You can change the name, password, groups etc. If you leave the password field
blank, then the password will not be altered. You cannot change a name that would result in duplicate names.
You can change the name of the admin user to anything you like, and even then change another user to be called
admin. However, internally all users and groups are identified by id, and user id = 1 is the admin user,
regardless of the actual user name. For this reason, you can delete any user, except user id = 1.
Repertoire also supports anonymous login where no login authentication is required. This is discussed in the section called “Anonymous Login”.
Rather than assign access rights at the user level, it is often more convenient to combine users into groups and assign rights to the group. Each user can belong to any number of groups. Any user who is assigned to the admin group will have the ability to administrate the server. Just like with users, group names can be changed, so group id = 1 is the admin group, regardless of what the group is actually called. For this reason, you can't delete group id = 1.
There is another special internal group "*" which has id = 2. This group is used to represent all users. Every user created automatically belong to this group. When describing access rights, for example in filesystems or secure .access files (described in the next section) you can use an asterisk (*) rather than enumerate every single user and/or group. The "*" group cannot be viewed or edited directly as it is managed by the system.
A filesystem is a collections of files such as datasource, report templates and dashboards that users can view over the web. An administrator has the option to create, edit, compact and delete filesystems, and also to grant access to certain groups. Compact will clean up the directory by removing all the backup files.
To create a filesystem, select the Create filesystem link at the
bottom of the Repertoire Filesystem list. Display Name and Configuration are required.
Every filesystems on the Elixir Repertoire Server must have unique name.
Administrator can assign the group(s) to have access to the filesystem.
There are five types of filesystem available: Dbfs, Jar, Jdbc, Local and Secure.
Note
Even if no privilege is being assigned to admin during the creation of a DBFS filesystem, admin will still have access to them.
- Dbfs
The Database filesystem (Dbfs) stores files in an SQL database within the server. The files in Dbfs support properties and you can manage user access to individual files or folders. The files and folders have three sets of permissions, for the owner, the owning group, and others. Each permission set may contain Read (r) and/or Write (w). When a file or folder is created it will inherit the access rights of the parent.
The configuration field contains the name of the store to use as store=[name] i.e. store=local. The configuration can be left empty, in which case the default store is local. A Dbfs
/Userfilesystem is automatically created when the server is first initialized and is given appropriate permissions for each user to store their personal files. You can create additional filesystems of type Dbfs as necessary.- Jar
A Jar filesystem stores all files and folders in a Java archive format, that is typically a file with a .jar or .zip extension. Files in a jar filesystem are read-only, so this is a useful way of deploying reports and dashboards so that you are certain they cannot be modified. The configuration field for a Jar filetype should provide the full path to the archive file. Remember this file must be on the server, so it is a server path name you are providing.
- Local
A Local filesystem stores all files in a directory tree on the server. This is often the easiest filesystem to use for single-server solutions as the storage mechanism is completely transparent. You can use all your regular file-handling tools for manipulating the directory tree. The configuration field for a Local filesystem should provide the full path to the root of the directory tree. Remember this tree must be on the server, so it is a server path name you are providing. Also, ensure you are running the server with a restricted set of permissions, (e.g. by creating a new user called repertoire and running the server from that user account) to prevent access to the entire server filesystem.
- Secure
A Secure filesystem is an extension to the local filesystem and used when the file access needs to be limited access to specific users and groups. A secure filesystem required a special file called .access to be placed inside each restricted directory of the filesystem, which allows the administrator to give different access privileges to named users and groups.
A .access file has this format:
#This is a comment
read:finance,sales
write:elixir
write:admin
Each file can have multiple read and write statements, one per line, in any order. Granting write access automatically grants read access. You can use either user names or group names and access is only allowed if explicitly granted. You can also use the special group "*" to allow access to everyone.
- Jdbc
The Jdbc filesystem is deprecated as it is replaced by Dbfs, which has additional access rights control. You can still access the files stored in any Jdbc filesystem but will no longer be able to create new filesystems of this type.
If you find yourself typing a string repetitively when configuring targets, you can define that string as a constant. Then you can refer to that constant in target property values like ${constant-name}. Target constants can be enabled/disabled. Only enabled constants can be used in target configurations and they will not appear in Repertoire Remote Designer. You can define multiple constants with the same name, but only one of them can be enabled at any time.
-
Target Creation/Update/Deletion
All manipulations can be done through the browser interface, under Administration->Targets. For most of the targets, configuration is simple. You need to provide a name, enable the target and provide values for required target properties.
-
Status
Targets can also be enabled/disabled. Only enabled targets can be used in RenderReport task. You can define multiple targets with the same name, but only one of them can be enabled. If you make one target enabled, the rest targets with the same name will be disabled automatically.
-
Target Properties and Parameters
Each target requires certain properties such as name of the report, mime-type of the report (A list of mime-types can be found through the browser interface under Administration->MIME Types), etc.
When editing a target, the web page lists all required properties for the target. An administrator has several options when configuring those property values:
- Provision of an exact string value for some properties.
- Reference to target constants.
- Definition of parameters in some properties if they should be provided by end users. For example, the parameter in property "filename" can be defined as "${file#report}_${date}". End users should provide values for those parameters when invoking targets.
When you create a new target, you will notice that all the properties are filled automatically with parameters. If you don't change them, those parameters should be provided by end users. In addition, nested parameters are not supported. For example, you cannot specify a parameter like ${file##${reportname}}.
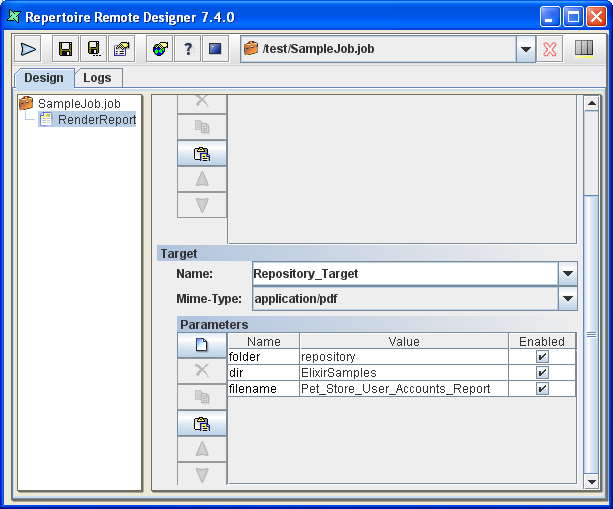
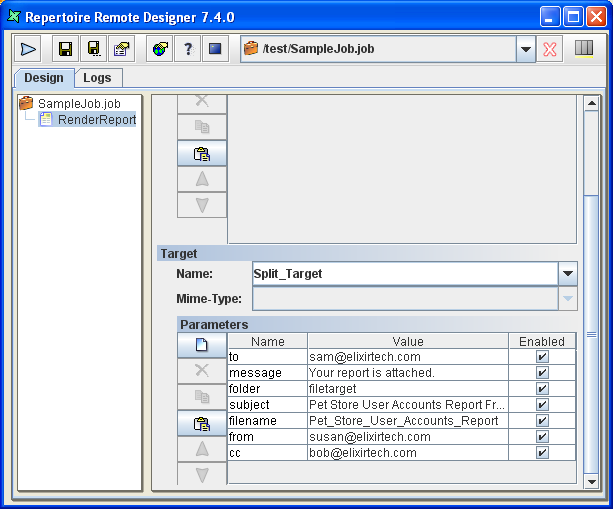
The following table, Table 6.2, “File Target Configurations”, are the individual targets configuration. Under "Properties", it shows the parameters entered through the web browser. The accompanying image, Figure 6.1, “File Target” is a screenshot of the Repertoire Remote Designer that shows the result of your configuration.
A Chain Target links a PDF Signer Target, together with other targets to form a series of events.
Table 6.1. Chain Target Configuration
| Name | value |
|---|---|
| chained-source | ${source##PdfSigner_Target} |
| chained-targets | ${targets##PrintTarget, Mail_Target} |
| delay-closed | ${delay-closed##true} |
| mime-type | ${mime-type} |
| chained-mode-onerror | chained-onerror-fail |
chained-onerror-fail discontinues the forwarding if source target contains error. chained-onerror-continue goes on with the forwarding regardless of the error in the source target.
A File Target represents a directory on the server where reports can be stored. You can define as many file targets as you need.
Table 6.2. File Target Configurations
| Name | Value |
|---|---|
| dir | ${output.dir}/${folder##filetarget} |
| overwrite | true |
| filename | ${filename##Pet_Store_User_Accounts_Report} |
| mime-type | ${mime-type##application/pdf} |
${output.dir} is the target constant created and it will not appear in the Repertoire Remote Designer.

A JDBC Target allows reports to be written directly into a database. This is useful if you have some subsequent program to pick them up or otherwise act on them - for example a document management system. Each report is written as a record into a specific table in the database. The report data itself is stored as a BLOB. Before you can use the JDBC target, you need to set up a database with a table that has the correct schema to accept a report file. An example as shown:
CREATE TABLE JOBOUTPUT (
  id INTEGER NOT NULL GENERATED ALWAYS AS
  	IDENTITY (START WITH 1, INCREMENT BY 1),
  name VARCHAR(256) NOT NULL,
  lastModified BIGINT NOT NULL,
  content BLOB NOT NULL,
  CONSTRAINT JOBOUTPUT_PK PRIMARY KEY(id) )
Once the database is setup, Figure 6.2, “JDBC Target” shows an example of the configuration through the browser interface that will write into a table called JobOutput in the Derby database that is built into the Elixir Repertoire Server:
Table 6.3. JDBC Target Configurations
| Name | Value |
|---|---|
| driver | org.apache.derby.jdbc.EmbeddedDriver |
| url | jdbc:derby:/home/ers/jdbctarget |
| table | ${update table##JobOutput} |
| user | ${userid##Enter your userid} |
| password | ${password##Enter your password} |
| name | ${filename##Job_Output_Report} |
| overwrite | true |
| mime-type | ${mime-type##application/pdf} |
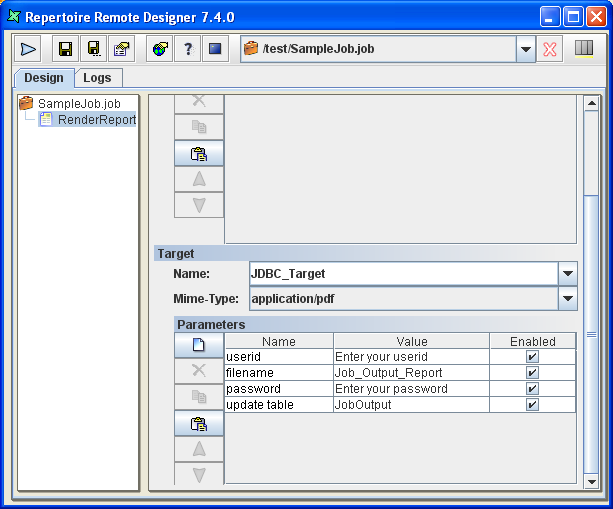
- user The user name to use when logging on to the database.
- password The password to use when logging on to the database.
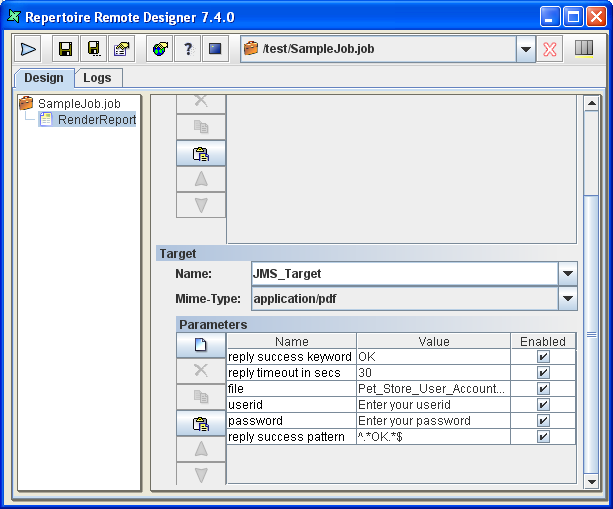
A JMS Target can be used for asynchronous messaging. JMS applications can use job messages as a form of managed request/response processing, to give remote feedback to the users on the outcome of their send operations and the fate of their messages. Examples of job messages are Exception, Expiration, Confirm on arrival (COA), Confirm on delivery (COD), etc.
You need to provide settings of the JNDI server. According to
JMS specification, all JMS connection factory and destinations
are hosted on a JNDI server and clients need to know how to
connect to the server before it can connect to the JMS broker.
You need to configure setting in ERS2.xml as you need to trigger
job execution by sending messages to JMS brokers. Uncomment
the block of codes for
mbean name="ERS2:name=JMSTrigger"
and edit the values that fit your JNDI provider and JMS broker
configuration.
For most of the JNDI servers, you need to provide property values like:
- java.naming.provider.url, which is the URL for JNDI server.
- java.naming.factory.initial, which is the context factory implementation provided by the JNDI server.
Different JNDI servers may also require some customized property values. You need to check JNDI servers documentation to find out what properties they support.
Configuration also needs to be done through the browser interface.
Table 6.4. JMS Target Configurations
| Name | Value |
|---|---|
| jms.destination | RQueue |
| jms.connection.factory | ConnectionFactory |
| jms.user | ${userid##Enter your userid} |
| jms.password | ${password##Enter your password} |
| jms.reply.required | true |
| jms.reply.timeout.seconds | ${reply timeout in secs##30} |
| jms.reply.success.keyword | ${reply success keyword##OK} |
| jms.reply.success.pattern | ${reply success pattern##^.*OK.*$} |
| filename | ${filename##Pet_Store_User_Accounts_Report} |
| mime-type | ${mime-type##application/pdf} |
Table 6.5. JNDI Properties
| Name | Value |
|---|---|
| queue.name | RQueue |
| java.naming.factory.initial | org.apache.activemq.jndi.ActiveMQInitialContextFactory |
| java.naming.provider.url | tcp://localhost:61616 |
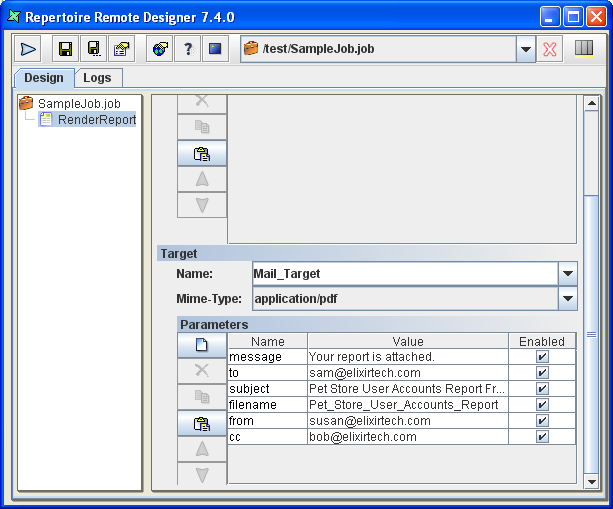
A Mail Target allows the output to be sent by email. Before using this,
ensure that the appropriate SMTP Server is configured in
ERS2.xml. The default SMTP server elixir.aspirin is built in to
Elixir Repertoire Server, so you only need to change it if you
wish to use an external SMTP Server. The smtp.host parameter can
either be the name of the SMTP Server mbean (we used
ERS2:name=GmailSMTPServer
when we discussed this in
the section called “SMTP Server”
) or the matching smtp.host value from the mbean that reference
to other SMTP Server of your choice.
There are a number of parameters to specify, but remember that you can use substitutions to avoid hard-coding those that you decide need to be flexible. The report will be sent as an attachment by email, so you can choose the render format you prefer.
Table 6.6. Mail Target Configurations
| Name | Value |
|---|---|
| smtp.host | elixir.aspirin |
| from | ${from##susan@elixirtech.com} |
| to | ${to##sam@elixirtech.com} |
| cc | ${cc##bob@elixirtech.com} |
| subject | ${subject##Pet Store User Accounts Report From Elixir Server} |
| message | ${message##Your report is attached.} |
| filename | ${filename##Pet_Store_User_Accounts_Report} |
| mime-type | ${mime-type##application/pdf}} |
PDF Signer Target is used when a PDF output needs to be signed digitally. It prints a "signature" in a PDF file when the file is rendered.
Table 6.7. PDF Signer Target Configuration
| Name | Value |
|---|---|
| signer-appearance | ${signer-appearance##self-signed} |
| keystore-type | ${keystore-type} |
| keystore-url | ${key.url##C:/Java/jre6/bin} |
| key-alias | ${key-alias} |
| key-password | ${key-password##keyStorePassword} |
| key-password-encrypted | true |
| sign-page | sign-last-page |
| sign-position | ${signature-position##bottom-right} |
| sign-width | ${sign-width##100} |
| sign-height | ${sign-height##60} |
| signer-image-url | ${signature-image-url##D:/image/logo.png} |
| output-mode | ${output-mode##output-mode-file} |
| output-file-location | ${output-file-location##../output/folder1/signed-pdf-document.pdf} |
| info-reason | ${info-reason##Reason for signature} |
| info-location | ${info-location##bottom-left} |
| certificate-level | ${certificate-level##certificate-no-changes} |
signer-appearance
There are two types of signing mode. They are self-sign and wincer-sign.
self-sign signer can be generated using Java key generator (keytool.exe). An example of a signature command is as follows :
keytool -genkey -keyalg RSA -alias QAkey -keypass mypassword
	 -keystore keystore.ks -dname "cn=My Key Name, c=SG"
wincer-sign is recommended if higher security is required. Certificate obtained is installed to the web browser and needs to be exported to be used in PDF signing.
keystore-type
For self-sign, no keystore type is required. For
wincer-sign, the keystore type will depend on the
respective vendor. For example, a VeriSign keystore type will be
pks12.
keystore-url
The directory of the keystore is entered here. repository is prohibited for this parameter.
key-alias
This parameter is optional. It is to define the alias used by the keystore file.
key-password
key-password is the password entered when creating the keystore file. The password can either be in encrypted or unencrypted form.
key-password-encrypted
This parameter holds a boolean value, true if the
key password is encrypted and false if otherwise.
sign-page
This parameter is to specify the page that the signature is placed. sign-no-page will mean that the signature will not be visible. sign-first-page and sign-last-page implies that the signature will be placed on the first and last page of the PDF file respectively. If you wish to place the signature on a specific page, enter the page number as the value for the parameter. For example, ${sign-page##5}, for placing the signature on the 5th page of the PDF document.
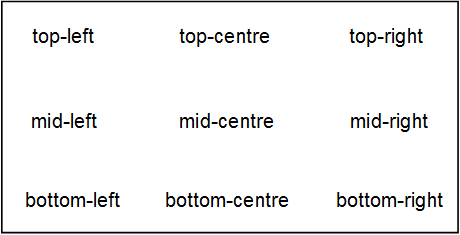
sign-position
The signature can be placed in different location of a document. Figure 6.5, “sign-position Options” displays the options available for placing a signature.
sign-width And sign-height
These two parameters are for user to specify the height and width of the signature rectangle size.
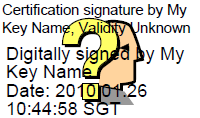
signer-image-url
The directory of the image that is to be used with the signature. When no value is entered for this parameter, the signature will appear like the in Figure 6.6, “PDF Signer - Sample Signature (self-signed)”.
output-mode
There are three output mode options.
- output-mode-file drops the
signed PDF file in the directory specified in
output-file-location. - output-mode-streamed-memory keeps the signed PDF file in memory and is to be used with Chain Target.
- output-mode-streamed-cached keeps the signed PDF document in a temporary file and it helps to keep the memory small when processing large files.
output-file-location
The directory to place the PDF output is entered here.
info-reason And info-location
The reason for placing a signature in the PDF document and the position of the reason.
certificate-level
- certificate-not
- has no visible signature in the PDF document. The document is digitally counter signed.
- certificate-no-changes
- displays the signature in the PDF document and no changes can be made to the document.
- certificate-form-filling
- also displays the signature in the PDF document, but only the filling in of forms, signing and page adding is allowed for the document.
- certificate-form-filling-annotation
- displays the signature in the PDF document, but only commenting, form fill-in, signing and page adding is allowed.

A Print Target allows you to send a report to a named printer. The only option is the name of the printer. If you have multiple alternate printers, you could use a separate target for each printer so that you could control access by different groups. In most cases, the printer names will be fixed and not include substitutions. You can also leave the printer name blank as it will route automatically to the default printer defined on the server.
A Repository Target writes the report to the filesystems in the Repertoire Remote Designer. You can identify a target folder in the repository and provided it is writable, files will be written there. This works regardless of whether the target filesystem is of type local, secure or dbfs. You should use Repository Targets when you want to allow users to view the reports through their browser as the repository will automatically update to show the latest files. If you use a File Target where the report is written to a target filesystem not in the Repertoire Remote Designer, users will not be able to access the report output using the Repertoire interface.
During the configuration, the "folder" property must refer the "dir##" parameter to an existing target filesystem in the repository. The "folder##" parameter need not as it will create a new folder after its name if it is not found in the repository.
Table 6.9. Repository Target Configurations
| Name | Value |
|---|---|
| folder | ${dir##ElixirSamples}/${folder##repository} |
| filename | ${filename##Pet_Store_User_Accounts_Report} |
| overwrite | true |
| mime-type | ${mime-type##application/pdf} |
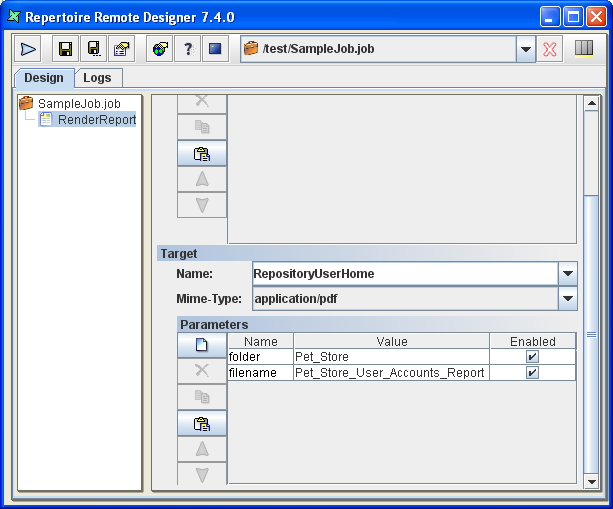
A Repository User Home Target writes the report to the invoking user's folder in the repository. Users can share jobs and they can keep separate output without overwriting one another. In the example, once the user "Jon" signs in to the repository and runs the job, the report will be written to /User/Jon/Pet_Store.
Table 6.10. Repository User Home Target Configurations
| Name | Value |
|---|---|
| folder | ${folder##Pet_Store} |
| filename | ${filename##Pet_Store_User_Accounts_Report} |
| overwrite | true |
| mime-type | ${mime-type##application/pdf} |
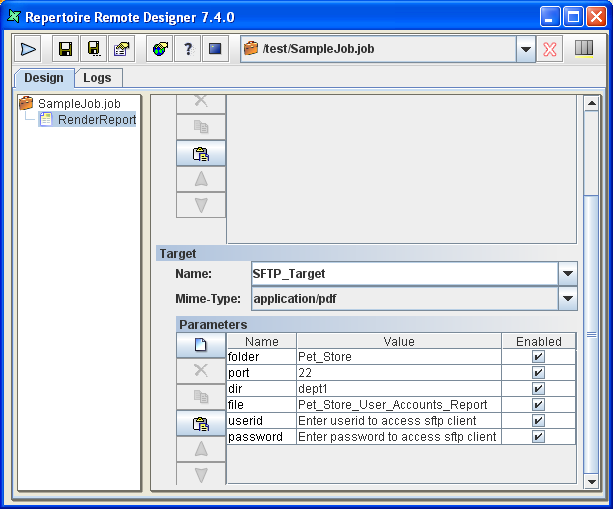
A SFTP Target allows the report to be transferred to a user's secured FTP Server. The available parameters are user, password, host, port, dir and filename. The port is optional and will default to 22, which is the default SFTP port, if not specified.
The parameter in "dir" property must be an existing directory found in the target ftp server.
Table 6.11. SFTP Target Configurations
| Name | Value |
|---|---|
| host | ${sftp host##domain_name.com} |
| port | ${port##22} |
| user | ${userid##Enter userid to access sftp client} |
| password | ${password##Enter password to access sftp client} |
| dir | ${dir##dept1}/${folder##Pet_Store} |
| filename | ${filename##Pet_Store_User_Accounts_Report} |
| mime-type | ${mime-type##application/pdf} |
A Socket Target sends the report to a program which is listening, typically on another machine. For example, a program can be written that listens on a company.com port 6000 and writes any data it receives to a database, or to a fax etc. It is up to the receiving program what it does with the data. The server opens a connection to the listening program, using the host and port information required by the socket target and streams the data across the network to the listening socket.
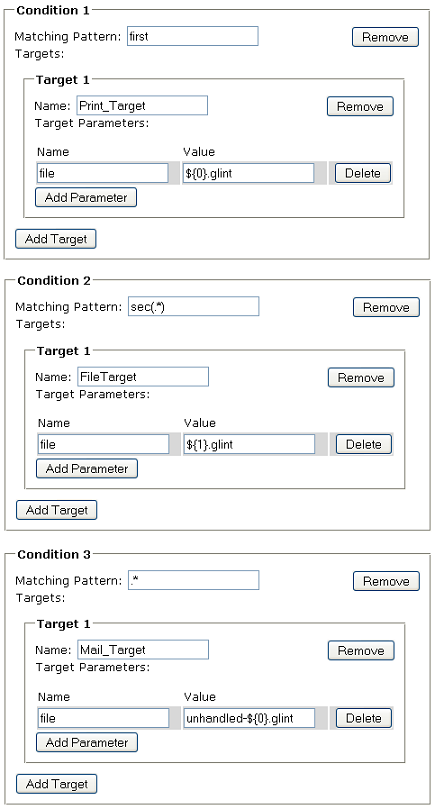
A Split Target allows you to split a single report into different sets of pages (sometimes called "Report Bursting"), you can configure a split target to describe how the report will be split and which pages will be forwarded to which targets.
You need to set up the report in the repository first, in order to run the job. An example as shown :
- Create a report template with four Sections of different contents.
- Make sure the Render Sequence table includes all four Sections.
- Go to the Section Header of each Section and choose Table of Contents from the property sheet.
- For Section 1, enter a literal string: first. Section 2 as second. Same applies for the third and fourth section. Make sure the TOC Enabled checkbox is ticked.
Please note that the TOC doesn't need to be four different sections, it could be four groupings of data (group header-details-group footer) in a single section itself.
Once the report is setup, proceed with the configuration from the browser interface.
When the "split" property is indicated as "1", it means to break at the top level splits. You might choose to break at any tree depth.
For each split condition, you need to configure a patten match string that matches certain title in table of contents. When a match happens, the matching portion of the report is sent to the targets configured in the split condition.
You can provide parameter values for the targets referred in split conditions. For example, you may want to send a portion of a report to "printer" target and the target required one parameter "file". So you can provide value for the "file" parameter as "${0}.glint". Note that the string contains another parameter ${0}, which is provided by Repertoire automatically when the split condition matches title of a report. (If you are familiar with regular expression, the parameter ${0}, ${1}, etc..actually refers to groups in the result of string pattern matching.)
Although the UI allows you to add more than one targets to a split condition, the matching report is only sent to the first target if the condition matches.
-
User Access Control
There is access control support on targets. For each user/group, administrators can specify which target he can access. For example, if a job is run under privilege of user "Jon", the reports rendered in the job can only be sent to targets that Jon can access. Note that there is a wild card "*" that represents any user/group/target. So you can specify access control rules for all users easily.
If you upgrade Repertoire server from a previous release, you need to manually import your target configurations from a ERS2-Config.xml file. You can do this task through the browser interface, under Administration->Targets ->Import target configuration.
During the import process, there are some migration work for each target to make them backward compatible with current job configuration.
For example, a FileTarget requires "filename" property, and that property may be provided in previous releases. To make this work after the target is imported to database, the parameter for "filename" property needs to be changed to ${filename##default-file-name}. So if a parameter for "filename" is provided in RenderReport panel, that parameter will be used. Otherwise, the default parameter in "filename" property will be used.
On clicking of MIME Types, a list of mime types for the Remote Designer will
be listed. 2 options are available. They are Disable and
Delete. By disabling the mime type, that particular option will not be
seen in the Render Wizard of the Remote Designer, therefore the user will be unable to render in
that particular mime type. To get the option back, simply enable the option.
If a mime type is deleted, the option will also be removed from the list in Render Wizard. However, in order to get it back, the user will need to add the mime type back and that can be done at the bottom of the screen.
The configuration of the search can be found in the Search administration page. You can enable or disable search service to the users. You can manually trigger or schedule the building of search index from the administration page.
You can do a full search index or by incremental build. An incremental build is where only a modified file is indexed. Increment index may decrease the time needed to index the repository. Schedule of indexing is recommended to reduce frequency of rebuild index. A recommended approach is you can do a full index once a day and trigger incremental index every one or two hours.
The index scheduler uses cron to control when the job is triggered, example 0 0 0 * * ? fires job every midnight. You should avoid triggering index job during peak hours or decrease the frequency during that time. For more information on the cron syntax see
http://www.quartz-scheduler.org/documentation/quartz-1.x/
tutorials/crontrigger
This is for enforcing security on datasource(s). More information can be found in the section called “Datasource Security”.
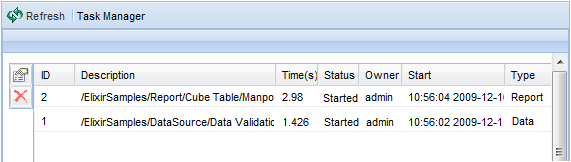
Task Manager can be accessed from Administration then
Task. Only ongoing tasks would be reflected in the table,
as seen in Figure 6.13, “Task Manager”.
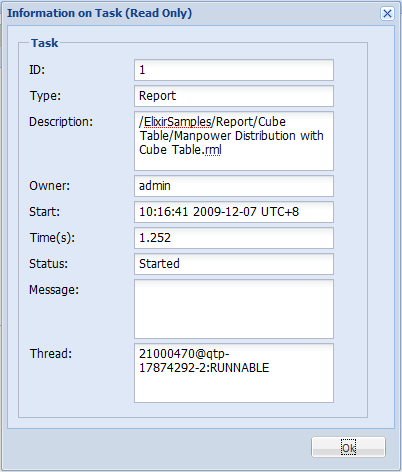
Clicking on a task in the Task Manager then on the View Information
icon will open a window like in Figure 6.14, “Task Information”. No editing can be
done.
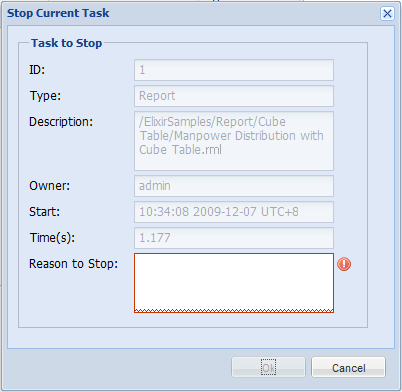
Clicking on a task, then the Stop icon, will open a window like
in Figure 6.15, “Stop Task”. A reason needs to be specified before the
job can be stopped.
Completed, failed, cancelled and timeout task(s) will be removed from the table.
A new log file, task.log will be added to
Logs, where the log files are placed. This log file keeps track of all
activities appearing under Task Manager.
Note
Task Manager does not refresh the page automatically. A manual refresh is required.
All logs from the server log directory are listed and can be inspected through the browser interface. The primary log is the activity log, which lists all session activities (logon and logoff) as well as generating and rendering actions. More detail is provided in the server log; this provides a fine-grain view of the system, which is primarily for debugging. The jetty log file lists all file accesses.