Elixir Repertoire server configuration files are located in the server configuration directory(./config). The files are
Server configuration
- ERS2.xml: determines loading of the core report server functionality as MBeans. There is also an ERS2-sample.xml, which is a backup file, in case you need to recover from any edits.
- jetty.xml: determines the configuration of the server, for example, the session timeout interval, JSP, etc.
Server log control, log-config.xml: set up the log configuration of the server.
Report Engine configuration, EREngine-config.xml: determines the setup of the rendering parameters for the report engine and the PDF font mapping location.
Elixir Repertoire Server 8.5.0 enables you to set Report Timeout to control the timeout interval for report rendering. Besides general rendering tasks, it can also work in conjunction with JDBC DataSource Timeout, as shown in Elixir Data Designer User Manual > Chapter 3. JDBC Datasource > JDBC Options. Report Timeout will start to function after JDBC DataSource Timeout takes its turn. In this file, uncomment the following command line and make necessary changes upon the timeout value to start using Report Timeout:
<property name="rml.render.timeout" value="60"/>
From Elixir Repertoire 8.6.0 onwards, you can control whether there will be a merged cell at the end of the report after it is rendered into XLS format, by editing the following codes in EREngine-config.xml:
<property name="elx.xlspipeline.merge-trailer" value="yes"/>
</properties>
The default value is set to "yes", which means there will be a merged cell at the end of the rendered report. Setting the value to "no" will enable you to render a report into an XLS file without merged cell at the end of the report.
Note
Setting the value to "no" might bring consequences to the report in XLS format, e.g. a cut-off of image, while the remaining things in the XLS file are normal.
Other config files are for internal use or debugging purposes.
The server machine name of the currently running instance can be altered after uncommenting a code segment in ERS2.xml.
<ers:property name="MachineName">Repertoire Server</ers:property>
Replace "Repertoire Server" in the code segment with the new name. View the server machine name by pointing your web browser to http://localhost:8080/query/machine/.
Alternatively, you can edit this in the bin/startServer.bat or bin/startServer.sh file, as shown in the section called “Renaming the Server”.
Password policy can only be enabled after uncommenting a code segment in ERS2.xml.
<ers:mbean name="ERS2:name=PasswordPolicy"
	class="com.elixirtech.ers2.security.PasswordPolicy">
	<ers:property name="MinLength">4</ers:property>
	<ers:property name="MaxLength">10</ers:property>
	<ers:property name="MustHaveDigit">true</ers:property>
	<ers:property name="MustHaveUpperCase">true</ers:property>
	<ers:property name="MustHaveLowerCase">true</ers:property>
	<ers:property name="MustHaveSymbolSet">!@$%</ers:property>
	<ers:property name="MustNotHaveSymbolSet">\/|</ers:property>
	<ers:property name="NotSameAsLogon">true</ers:property>
	<ers:property name="PasswordMaxExpiresDays">90</ers:property>
	<ers:property name="DifferentPasswordCount">2</ers:property>
	<ers:property name="RetryAttemptLockoutCount">5</ers:property>
	<ers:property name="RetryAttemptDelaySecs">5</ers:property>
	<ers:property name="RetryAttemptDelayMultiplier">2</ers:property>
</ers:mbean>
- MinLength
- Minimum length of password
- MaxLength
- Maximum length of password
- MustHaveDigit
- Password must contain at least one numeric character. Boolean type.
- MustHaveUpperCase
- Password must contain at least one alphabet in upper case. Boolean type.
- MustHaveLowerCase
- Password must contain at least one alphabet in lower case. Boolean type.
- MustHaveSymbolSet
- Password must contain at least one symbol.
All symbols are acceptable except "<", ">" and "&".
If the administrator wants to allow the use of
"<", ">" and "&", a specific syntax must be
used. Below is an example for wanting to use "&".
<![CDATA[&]]>
- MustNotHaveSymbolSet
- Password must not contain any symbols. User can enter symbol(s) when trying to change the password, but it will be rejected when user tries to finalise the change.
- NotSameAsLogon
- Password must not be the same as the username.
- PasswordMaxExpiresDays
- Duration before password expires. In number of days.
- DifferentPasswordCount
- The number of previous passwords to be remembered. By default, the server would remember the 5 different passwords used previously. The maximum count is 5.
- RetryAttemptLockoutCount
- Number of failed logins before account is locked
- RetryAttemptDelaySecs
- The delay time before user can retry login
- RetryAttemptDelayMultiplier
- The multiplier rate for the day. For example, RetryAttemptDelaySecs=10, RetryAttemptDelayMultiplier=2, 1st login failure= delay login retry is 10 seconds, 2nd login failure=delay login retry is 20 seconds and so on.
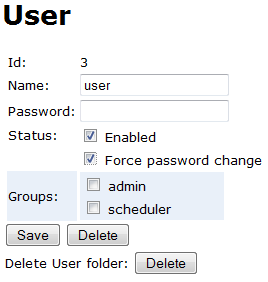
If the administrator simply wants a user to change the password upon the next
login and no other conditions need to be satisfied, it is unnecessary to use the
password policy. Simply check Force password change
as seen in Figure 4.1, “Force Password Change”. If desired, both the
selection and the password policy can work together.
The notification service sends an email or post a tweet when the tasks in the queue exceed the maximum percentage limit in the settings. You have the option to encrypt secret values when setting up email or Twitter account details for receiving notification.
The notification service can be enabled by modifying the command line containing
"NotifyMaxQueueCountExceeded" and setting the value to true.
The maximum task number and percentage can be configured in the following code segment in ERS2.xml. For percentage, minus value (<0) means no notification, and positive value (>0) means notifying according to percentage (60 = 60 percent).
<ers:mbean name="ERS2:name=Jetty"
class="com.elixirtech.jetty.JettyLauncher">
<ers:property name="MaxRenderCount">4</ers:property>
<ers:property name="MaxQueueCount">100</ers:property>
<ers:property name="NotifyMaxQueueCountExceeded">true</ers:
property>
<ers:property name="NotifyThresholdQueueCountExceededPercentage">
60</ers:property>
In this example, when the queueing task number exceeds 100 * 60% + 4 = 64, which means starting from 65, you will receive a notification message.
To make sure you can receive the notification message, uncomment the following code segment in ERS2.xml:
<ers:mbean name="ERS2:name=NotificationMail"
class="com.elixirtech.ers2.notification.Notification">
<ers:property name="ConfigPath">../config/notification/email.xml
</ers:property>
</ers:mbean>
<ers:mbean name="ERS2:name=NotificationTweet"
class="com.elixirtech.ers2.notification.Notification">
<ers:property name="ConfigPath">../config/notification/tweet.xml
</ers:property>
</ers:mbean>
<ers:mbean name="ERS2:name=NotificationLog"
class="com.elixirtech.ers2.notification.Notification">
<ers:property name="ConfigPath">../config/notification/log.xml
</ers:property>
</ers:mbean>
To receive notification via email: Fill your email information into /config/notification/email.xml.
To receive notification via tweet: Sign up for a Twitter account, obtain the keys from dev.twitter.com app, and fill your information into /config/notification/tweet.xml.
To encrypt secret values in email or Twitter account details: Run the encrypt.sh file in the RepertoireServer/bin/ folder with the secret value as needed (smtpPassword, consumerSecret, or tokenSecret). Edit the email.xml or tweet.xml file accordingly, as shown in the following table:
| File | Places To Edit |
|---|---|
| email.xml |
|
| tweet.xml |
|
The Task Manager timeout properties can be manually set in the ERS2.xml file.
Timeout (Seconds): This property decides how long Task Manager will wait before canceling the report.
Monitor Interval (Seconds): This property decides how often Task Manager will check if a task has exceeded the timeout interval.
Flush Interval (Seconds): This property determines how long Task Manager will keep the tasks in the task list once they have been completed or have timed out.
Type: This property enables you to set the type of the tasks, whose timeout situation will be monitored by Task Manager. There are three options for this property value: *, Report, or Data, where * means Report and Data.
<ers:mbean name="ERS2:name=TaskMonitorThread"
class="com.elixirtech.ers2.task.TaskMonitorThread">
<ers:property name="Timeout">0</ers:property>
<ers:property name="MonitorInterval">60</ers:property>
<ers:property name="FlushInterval">600</ers:property>
<ers:property name="Type">*</ers:property>
</ers:mbean>
Jetty buffer size is configurable in the ERS2.xml file.
In the ERS2.xml file, find the following code:
<ers:property name="SocketConnectorHeaderBufferSize">4096
</ers:property>
The default Jetty buffer size is set to 4K (4096) bytes. You can enable server to use a bigger value upon your requirement, e.g. 16K (16448) bytes, by changing the value here.
In ERS2.xml, look out for the codes at the bottom of the document
which suggests about the using of JMS. Replace the name, TestQueue,
to the sending queue name created in Apache (e.g. SQueue).
Next, copy activemq-all-5.1.0.jar from JMS broker and place it in /RepertoireServer/ext then start the server. Start a browser and connect to Repertoire Server Web Interface (http://localhost:8080) and login.
With the JMS broker started, on another browser to go to the JMS broker web interface
(e.g. http://localhost:8161/admin) to send a trigger job message. The message Destination
is set to the sending queue (e.g. SQueue) and Reply To is set to the
receiving queue (e.g. RQueue). The message content format will be as follows :
<trigger>
  <run-as-user auth="YWRtaW46c2E="/>
  <job path="/testing/JMSbroker.job">
  <parameters>
    <parameter name="UserAge">26</parameter>
    <parameter name="UserName">David Tan</parameter>
    <parameter name="UserGender">M</parameter>
  </parameters>
  </job>
</trigger>
Click on the Send button to send the message. (In this example,
admin is used and is converted to Base64 format.)
On the JMS broker web interface, select RQueue and check for the received message. A message should be received after the job has been processed. The message content should be like the following:
<?xml version="1.0" encoding="UTF-8"?>
<trigger-response>
<result>OK</result>
<details>Job '/testing/JMSbroker.job' completed successfully.
  </details>
<job-log>INFO 2008-05-29 11:33:35,796 Job: Job Start INFO 2008-05-29 11:33:39,718 RenderReport:
  render "repository:/testing/report/Report.rml",elapsedTime:
  3547 pageCount: 1 byteCount: 17921 mimeType: application/pdf
  statusCode: 1
  INFO 2008-05-29 11:33:39,718 Job: Job
  End Successfully </job-log>
</trigger-response>
Back to Repertoire Server web interface, under Logs, click on
server.log. The following extracted logs should be seen:
Thread-51,INFO , jms.JMSTriggerThread - executing Job
  /testing/JMSbroker.job
Thread-51,INFO , Scheduler.Job - Job: Job Start
Thread-51,INFO , target.FileTarget - Opened
  C:\RepertoireServer\bin\..\output \folder1\file.pdf for writing
Thread-51,INFO , target.FileTarget - Closed
  C:\RepertoireServer\bin\..\output \folder1\file.pdf
Thread-51,INFO , target.FileTarget - Closed
  C:\RepertoireServer\bin\..\output \folder1\file.pdf
Thread-51,INFO , Scheduler.Job - RenderReport: render
  "repository:/testing/report/Report.rml",elapsedTime: 3547
  pageCount: 1 byteCount: 17921 mimeType: application/pdf
  statusCode: 1
Thread-51,INFO , Scheduler.Job - Job: Job End Successfully
Thread-51,INFO , jms.JMSTriggerThread - Job
  '/testing/JMSbroker.job' completed successfully.
Check for the generated pdf file in /RepertoireServer/output/folder1. The pdf file will contain the values of the parameters set when creating the JMS message.
In jetty.xml, this property sets the amount of time taken before a session timeout. It can be changed by editing the figure in the following code:
<session maxInactiveInterval="6000"/>
It is measured in seconds and the default setting is 6000 seconds, which is equivalent to 100 minutes.
In jetty.xml, find the following code:
<anonymous enabled="false" user="public" pass="anonymous"/>
Change it from false to true to enable anonymous login.
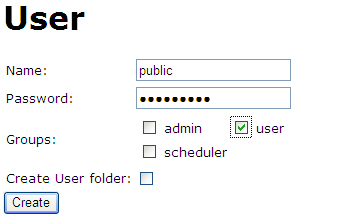
Create the User ID through the server web interface as shown in Figure 4.2, “Create a Anonymous User ID”.
Name and Password must be in sync with the choice
of login parameters stated in jetty.xml.
Log off from the web interface and restart the server by shutting down the server and starting it again. Then, go to the Repertoire Server web interface once again. The user will be now able to enter to the page with no prompts for User ID and password unless the user visits the login page explicitly.
Before being able to see the JSP verification page when starting up the server,
there are a few steps to execute. Firstly, in jetty.xml, we will need to
change the following code to
true instead of false, which is the
default setting:
<jsp enabled="false"/>
core-3.1.1.jar, jsp-2.1-jetty-6.1.15.jar, jsp-2.1-glassfish-9.1.1.B51.25.p1.jar and jsp-api-2.1-glassfish-9.1.1.B51.25.p1.jar need to be placed in /RepertoireServer/lib/jetty for JSP to work.
Now, start the server by executing startServer.bat. Open a
browser and enter http://localhost:8080/test/simple.jsp. The user
will be prompted to login. After a successful login, the user will be able to see
the JSP Verification page.
In jetty.xml, look out for the following code:
<mime-types>
<mime-type ext="doc" type="application/msword"/>
</mime-types>
User can add more extensions which are not recognized by the browser, following the same format as the one given. User can simply add the extension(s) before or after the line in jetty.xml.
Before the server is able to deploy a WAR file, the server has to be configured to support JSP. For information on how to do that, refer to the section called “JSP Support”.
Then, place the WAR in the C: directory. In jetty.xml, look out for the following line:
<war file="C:/hello.war" url="/hello"/>
Enable this line by having it outside of the comments. If the file is saved in C:/Documents and Settings/Admin/ElixirHome, user can define as:
<war file="${elixir.home}/hello.war" url="/hello"/>Save the file and start Repertoire Server. Open a web browser. Enter http://localhost:8080/hello/ in the URL. The web page will then load the JSP file.
The administrator can set log-config.xml found in the /RepertoireServer/log to display logs from one or more particular users. In order to do that, the administrator will need to add in the following set of codes into log-config.xml. The actions of the user(s) will all be captured in a log file named activity-user.log.
<appender name="Activity-User"
	class="org.apache.log4j.RollingFileAppender">
	<param name="File" value="../log/activity-user.log"/>
	<param name="Append" value="false"/>
	<param name="Encoding" value="UTF-8"/>
	<param name="MaxBackupIndex" value="5"/>
	<param name="MaxFileSize" value="500KB"/>
	<layout class="org.apache.log4j.PatternLayout">
  		<param name="ConversionPattern"
  		value="%d{ISO8601},%-5p,%-10X{username}, %m%n"/>
  	</layout>
	<filter class="com.elixirtech.arch.log.UserNameFilter">
		<param name="UserName" value="userABC" />
		<param name="AcceptOnMatch" value="true" />
	</filter>
	<filter class="org.apache.log4j.varia.DenyAllFilter"/>
</appender>
If the value set for UserName is userABC, the logs
will be only of userABC. If the administrator wants to capture more than one
particular user, the administrator will need to have additional filter tags
with UserName and AcceptOnMatch attributes.
If the administrator do not want any logs from specified user(s), the administrator will only need to edit the true value to false in AcceptOnMatch attribute and remove the following line from the config file :
<filter class="org.apache.log4j.varia.DenyAllFilter"/>
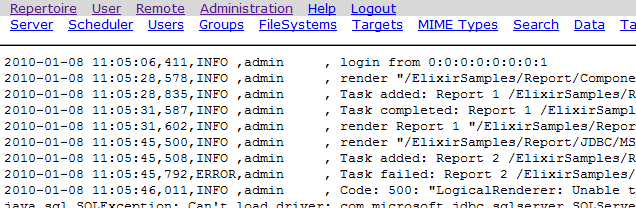
If the administrator wants to have a unique identity added to a render report task, or data generation task, insert the following in the ConversionPattern attribute. This will help users narrow down which report invocation is causing the problem when error occurs. Figure 4.3, “Activity Log” displays a sample of the activity log.
%X{task}
In order for any changes to take effect, Repertoire Server will need to be restarted.