In this section we will discuss the different ways of adding the text data sources.
If you are given a text file in which the fields are enclosed within quotes and are separated by semicolon you can easily add it as a datasource. In this example we will use the EmpInfo.txt file from the Elixir Data Designer samples.
Choose a file system or folder and use the popup menu to select Add -> DataSource.
The DataSource Wizard appears. Select the Text DataSource and click the Next button.
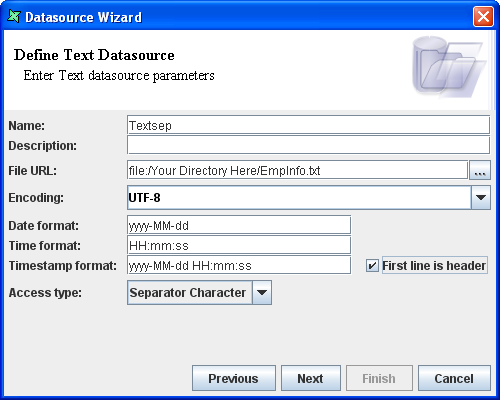
The "Define Text DataSource" screen appears.
Enter a unique name, such as
Textsep.Enter the URL in the text box provided. Alternatively, by clicking the button to the right of the text field, select the file from the Open dialog window.
Select ASCII as the Encoding option as the EmpInfo.txt file is in ASCII format.
The Date format, Time format and Timestamp format text fields can have default values.
Select the First line is header check box.
Select the Separator Character Access type. After setting the properties the screen appears as shown in Figure 6.6, “Sample Text DataSource”. Click the Next button.
Select Semicolon as the Separator.
Select " option from the Qualifier combo box.
Click the Infer Schema button and click the Finish button.
You can then open the Textsep.ds data source and click Load Data to view the output.
Here's how to add a text file by passing a dynamic parameter to the URL.
Open the Add -> DataSource wizard to create a Text DataSource as before..
On the "Define Text DataSource" screen, enter a unique name such as
Text_URL.Enter the URL as ${URL}. This indicates a dynamic parameter will be inserted here when we use the data source.
Follow the rest of the steps as described in the previous section.
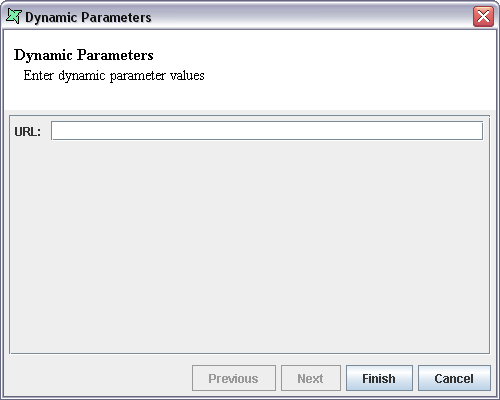
You will find that on clicking the Infer Schema button a dialog appears as shown in Figure 6.7, “Dynamic Parameters”.
Enter the URL as given below (modify according to the location of your EmpInfo.txt file - remember in URLs all slashes are '/' even on Microsoft operating systems).
file:/C:/EmpInfo.txt
The columns in the data source are listed in the window. Click the Finish button.
The Text_URL data source is added to the repository. Select and double click on the Text_URL.ds data source. On clicking the Load Data menu the Dynamic Parameters dialog window appears. Enter the URL in the text box. On clicking the Finish button the output is displayed. You can now substitute any other file URL that conforms to the same schema (i.e. has the same number and type of fields) and the data source will load it correctly.
Here's how to add a text file having columns of fixed width.
Use the file system or folder popup menu to select Add -> DataSource.
The DataSource Wizard appears. Select the Text DataSource and click the Next button.
The "Define Text DataSource" screen appears.
Enter a unique name, such as
Text_Width.Enter the URL in the text box provided. Alternatively, click click the button to the right of the text field to invoke the chooser. In this case we will select the DateJoin.txt file.
Select the First Line is Header check box.
Select Fixed Width as the Access type and click the Next button.
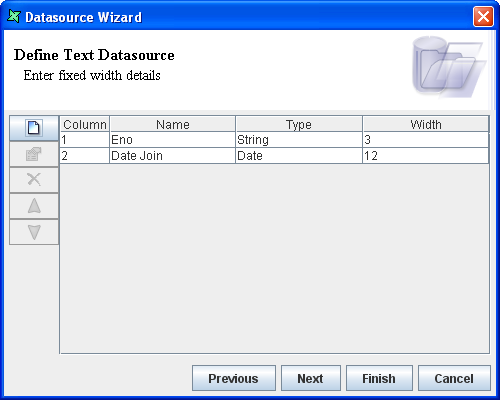
Add a column named
Enowith data type String and width 3.Add a second column named
Date Joinwith type String and width 12.The columns are added to the Wizard. The screen appears as shown in Figure 6.8, “Fixed Width Sample”. Click the Finish button.
The Text DataSource is added to the repository. Select and double click on the Text_Width.ds data source. By clicking the Load Data menu you can verify the output.
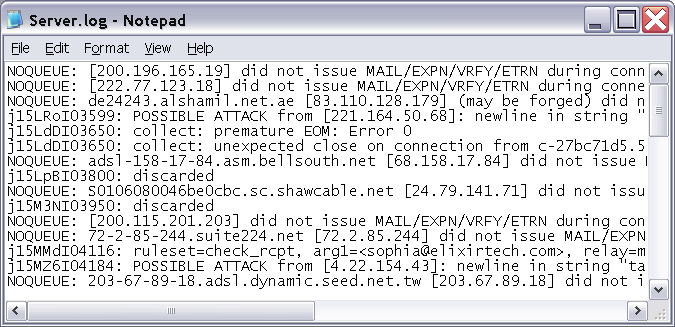
Here's how to extract data from a log file like Figure 6.9, “Log file”. This can be achieved easily by using the Regular Expression Access type:
Use the filesystem or folder popup menu to select Add -> DataSource.
The DataSource Wizard appears. Select the Text DataSource and click the Next button.
The "Define Text DataSource" screen appears.
Enter a unique name such as
Text_RegExp.The URL in this case will be the path to Server.log (you can use the Open dialog to find it).
Select Regular Expression as the Access type and click the Next button.
The "Define Text DataSource" screen appears. The Regular Expression details are entered in this screen.
Click the "..." button on the right of the Regular Expression text box. The Regular Expression Designer Window appears.
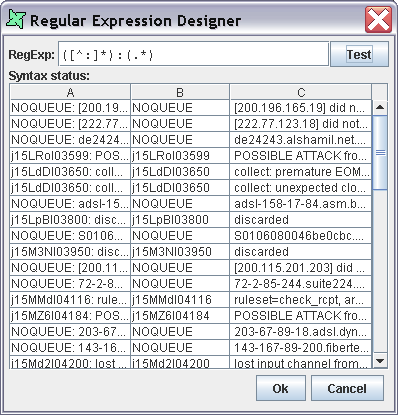
In the RegExp text box enter the Regular Expression as given below
([^:]*):(.*)
This breaks the log into two chunks. The first part "([^:]*)" reads up to the first colon. The second part "(.*)" reads everything else. There is an explicit colon in the middle, so this is not part of either chunk. See a regular expression reference for more help in interpreting this syntax.
Click on the Test button to check the syntax status. If there are no errors in the syntax then the columns are displayed in the window of the designer as shown in Figure 6.10, “Regular Expression Designer”. The first column shows the original line, the subsequent two columns (in this case) shown the portion of text that matches the groups in the expression. On clicking the Ok button the syntax is assigned in the Regular Expression text box.
On clicking the Infer Schema button the columns are inferred based on the groups in the regular expression.
Click the Finish button. The Text_RegExp data source is added to the repository.
Select and double click on the Text_RegExp.ds data source. Use the Load Data button to ensure the output is correct. We have split the data into two fields, but this particular log has two different formats embedded in it. The text at the bottom, below "**Unmatched Entries**" is in a different format. Notice that the line "**Unmatched Entries**" is not in the output, because it doesn't include a colon, so it is automatically discarded. We can discard the lines below this with a Stop expression.
Here's how to add a log file using only part of the data from the file. To do this the Start Expression and Stop Expressions are used along with the Regular Expression.
Create a data source as described in the previous example, or modify the one you've already created.
In the Regular Expression designer window click the "..." button to the right of the Stop Expression text box. The Regular Expression designer window appears.
In the Stop RegExp text box enter "**Unmatched Entries**" (without the quotes). You will notice a syntax error is reported because * is a special character in regular expressions. Insert a backslash before each * to have them handled literally: "\*\*Unmatched Entries\*\*". This will remove the syntax error warning and you can click on the Test button. Only one record will be found by this expression, the line which marks the start of the second log section. On clicking the Ok button the syntax is assigned in the Start Expression text box.
On clicking the Infer Schema button the columns are inferred as before.
Click the Finish button.
If you view the output of this data source, you will see that only the lines up to the Stop expression are processed, those with a different format below are now skipped. If you wanted only those items below, you could move the Stop expression to the Start expression, and now only records after the Start matches would be processed. The Text DataSource can support the extraction of multiple chunks by using combinations of start and stop.