The first Text DataSource properties screen is shown in Figure 6.1, “Define Text DataSource”.

The Name of the data source is entered in the Name text box and any extra description that is used to describe the data source can be entered in the Description text box.
By default, the text files are in ASCII format. If a text file with an alternate encoding needs to be accessed then the encoding type should be selected from the Encoding combo box.
The format of any dates in the text file is entered in the Date format text field.
The format of any times in the text file is entered in the Time format text field.
The format of any timestamps (date and time) in the text file is entered in the Timestamp format text field.
By default the date, time and timestamp formats are specified according to ISO standards.
The URL of the file containing the text is specified in the File URL text box. Alternatively, by clicking the button on the right of the text box, the file can be selected from the Open dialog window. Note that this URL can access not only local files, but any files accessible through HTTP, FTP or from the repository (use the repository: prefix).
There are three different ways of extracting data from a text file: Separator character, Fixed Width and Regular Expression.
Separator Character
On selecting the Separator Character access type and clicking the Next button the screen as shown in Figure 6.2, “Separator Type Properties” appears. The separator details are entered in this screen.
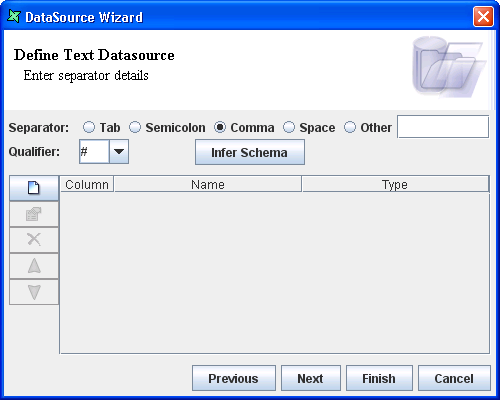
The type of separator is chosen from among the different Separator options. If there is any special type of separator other than those specified then that particular separator must be entered in the "Others" text box. The type of qualifier used in the text file can be selected or entered in the combo box.
The Infer Schema button is used to infer the schema.
On clicking the Add Column button the Add Column dialog window pops up.
The name of the new column is entered in the text box and the data type of the field is selected from the combo box. The new column is added to the data source.
The column can be edited by selecting the Edit Column button. The Move Up, Move Down are used to reorder the columns. The Remove Column button is used to delete a column.
Fixed Width
On selecting the Fixed Width access type and clicking the Next button the screen appears as shown in Figure 6.3, “Fixed Width Type Properties”.
On clicking the Add Column button the Add Column dialog window pops up.
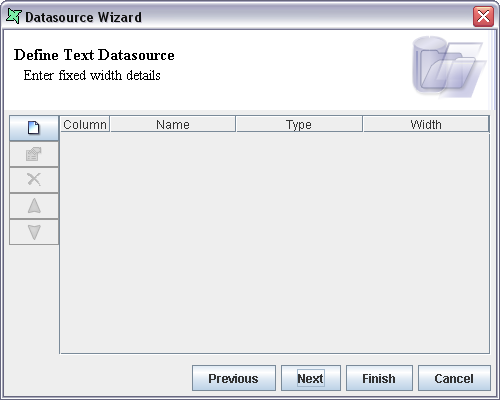
The name of the column is entered in the text box and the data type of the field is selected from the combo box. The width of the column is entered in the text box. On clicking the OK button the new column is added to the data source.
Using the Edit Column, Move Up, Move Down and Remove Column button the columns can be edited, re-ordered or deleted as necessary.
Regular Expression
On selecting the Regular Expression access type and clicking the Next button the screen appears as shown in Figure 6.4, “Regular Expression Type Properties”.
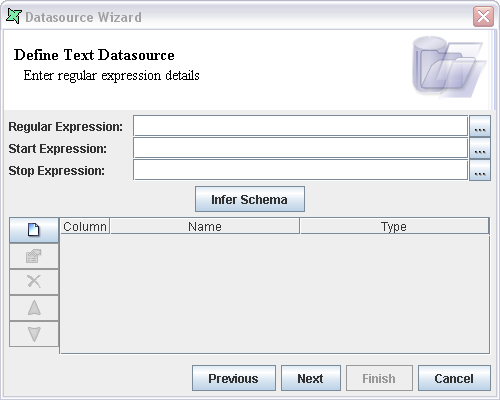
In this window the Regular Expression can be entered in the Regular expression text box.
Alternatively, by clicking the button to the right of the text box a separate designer window appears as shown in Figure 6.5, “Regular Expression Designer”.
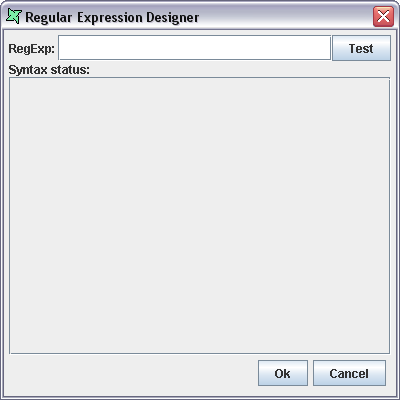
The Regular expression is entered in the RegExp text box and the Test button is clicked to test the validity of the expression. If the expression is not valid then syntax errors are displayed. If there are no syntax errors then the fields are displayed in the window. Finally, on clicking the Ok button, the expression is assigned in the Regular Expression text box.
Regular expression processing requires the entry of up to three regular expressions. The first one, named Regular Expression is mandatory. This selects which records are included in the result and how the field values are extracted from those records. For example, a regular expression such as "^abc(.*)" will only pass through those records where the line begins with abc (^ marks the beginning of the line) and extract a single field, matched by the rest of the line (.*) meaning a group which contains zero or more characters). Similarly, "(.*),(.*)" will extract two fields, separated by a comma. In this case, all lines will be used, as there is no filter criteria, like the "^abc" in the earlier example. There are plenty of books and on-line resources which will give full details of regular expression syntax.
So far we have only looked at one regular expression. There are two more: Start and Stop. These are optional, but if supplied will turn on, and off record processing. If a Start expression is supplied, all lines will be discarded until this Start expression is matched. Subsequent lines will be processed as described previously until the Stop expression (if supplied) is matched. Subsequent lines will again be discarded. A brief example will show how useful this is.
 Summary Jon,Total Bill,Total Details Jon Jon,First
			Jon,Second Bill Bill,First Bill,Second Bill,Third Comments
			None,Nothing
Given the above text file, we can extract just the details by using these three expressions: Start = "Details", Stop = "Comments", Regular Expression = "(.*),(.*)". Of course, you leave out the quotation marks when entering expressions into the text fields. This configuration will ignore all the Summary values (even though they match the Regular Expression criteria of two fields separated by a comma). Once we reach the line which matches the start criteria "Details" the Regular Expression matching starts. The next line just contains "Jon", which doesn't match the Regular Expression requirements and so is discarded. "Jon,First" and "Jon,Second" do match, so they are passed through as records. "Bill" doesn't match, so it is skipped, but "Bill,First", "Bill,Second" and "Bill,Third" are passed through. Finally, we reach a line which matches the Stop expression, so subsequent line processing is turned off (which means "None,Nothing" is discarded). To summarize, five records, each containing two fields are extracted:
 Jon,First Jon,Second Bill,First Bill,Second
			Bill,Third
The Start Expression is entered in the Start Expression text box. Alternatively, on clicking the button to the right of the text box the Regular Expression Designer Window appears. The Start Expression can be entered in the RegExp text box, tested and added.
The Stop Expression is entered in the Stop Expression text box. Alternatively, on clicking the button to the right of the text box the Regular Expression Designer Window appears. The Stop Expression can be entered in the RegExp text box, tested and added.
The Infer Schema button is used to infer the text data source columns based on the number of groups in the regular expression.