In this section we will look at adding an Excel DataSource with a variety of alternative ranges.
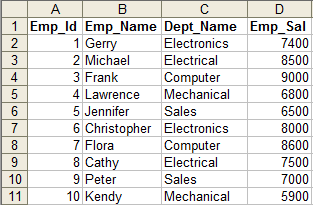
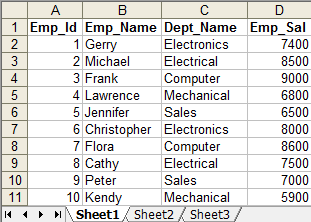
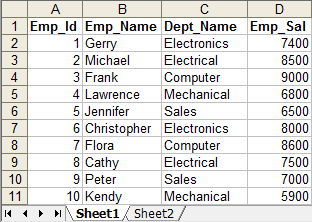
Let's start with an Excel file EmpInfo.xls that consists of Emp_Id, Emp_Name, Dept_Name and Emp_Sal as shown in Figure 5.3, “EmpInfo.xls”.
Here's how to define an Excel DataSource containing all the Employee details:
Before adding an Excel DataSource, the range must be defined in the Excel file.
Open the EmpInfo.xls file.
Select the Name -> Define under the Insert menu. The Define Name dialog box pops up.
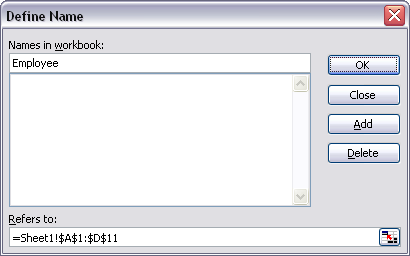
Enter name as "Employee" and enter the range as given below in the "Refers to:" text box.
=Sheet1!$A$1:$D$11
Here $1 corresponds to the first cell in the file and as there are a total of ll records in this Excel file including the header. $11 corresponds to the last cell containing the final record. The Define Name dialog box appears as shown in Figure 5.4, “Define Name”. Click the OK button in the Define Name dialog box. Save the Excel file.
Launch Elixir Repertoire.
Choose a filesystem or folder and use the popup menu to select Add -> DataSource.
The DataSource Wizard appears. Select Excel DataSource and click on the Next button.
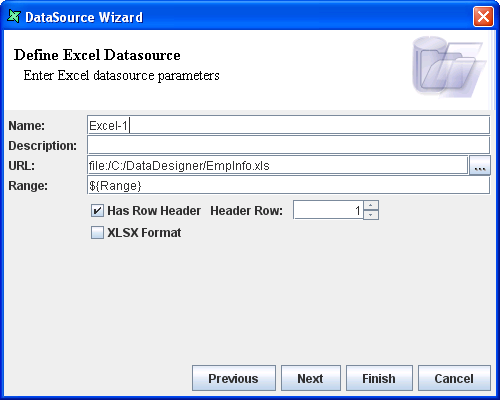
The Define Excel DataSource screen appears. Enter name as Excel-1.
Enter the URL for EmpInfo.xls in the text box provided. Alternatively, by clicking the button on the right of the text field select the EmpInfo.xls file from the File Open dialog.
Enter "Employee" in the Range field.
Select the First Row Header check box and click on the Next button.
The screen appears as shown in fig. Click on the Infer Schema button. Change the Data Type of Emp_Id and Emp_Sal from Double to Integer Figure 5.5, “Completed DataSource Wizard”.
Click the Finish button in the DataSource Wizard.
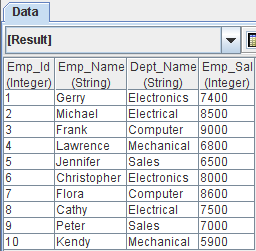
The Excel Data Source is added to the repository. Click the Load Data menu.
The Excel file is loaded displaying the employee details present in the Excel sheet as shown in Figure 5.6, “Result”.
This time we will work with the file EmpDetail.xls. This consists of employee details in three worksheets as shown in Figure 5.7, “EmpDetail.xls”.
Here's how to get the values across all the sheets:
Before adding an Excel DataSource, the range must be defined in the Excel file.
Open Empdetail.xls file.
Select the Name -> Define under the Insert menu. The Define Name dialog box pops up.
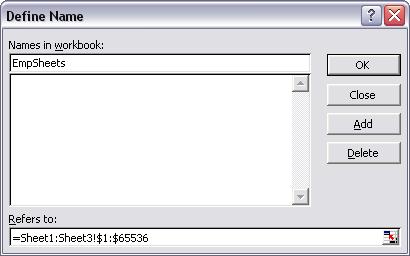
Enter name as "EmpSheets" and enter range as given below in the "Refers to:" text box
=Sheet1:Sheet3!$A$1:$D$11
The above syntax includes the cells in sheet1, sheet3 and all the sheets between them. After setting the values the Define Name dialog window appears as shown in Figure 5.8, “Define Name”. Click the OK button in the Define Name dialog box and save the Excel file.
Launch Elixir Data Designer.
Choose a filesystem or folder and use the popup menu to select Add -> DataSource.
The DataSource Wizard appears. Select Excel DataSource and click on the Next button.
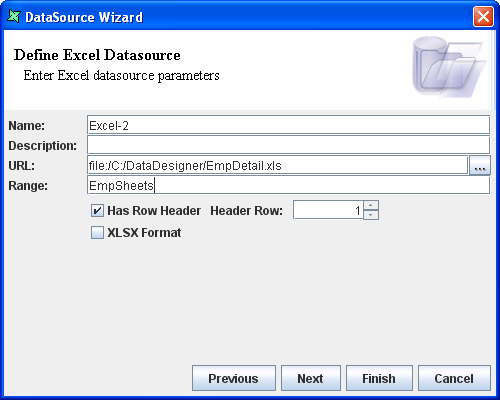
The Define Excel DataSource screen appears. Enter name as Excel-2.
Enter the URL for EmpDetail.xls in the text box provided. Alternatively, by clicking the button on the right of the text field select the EmpDetail.xls file from the File Open dialog.
Enter "EmpSheets" in the Range field.
Select the First Row Header check box and click on the Next button.
Click on the Infer Schema button in the screen shown in fig. Change the Data Type of Emp_Id and Emp_Sal from Double to Integer. Figure 5.9, “Completed DataSource Wizard”.
Click the Finish button in the DataSource Wizard.
The Excel DataSource is added to the repository. Double click on the Excel-2.ds data source. Click the Load Data menu.
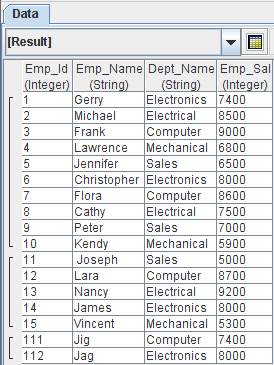
The Excel file is loaded displaying the employee details present in all the Excel sheets as shown in Figure 5.10, “Result”.
To control the behavior of Elixir Data Designer dynamically, dynamic parameters are used. The parameters are specified in place of a value or values while setting the properties of a datasource or Composite element, and the value is assigned during the generation process. The generation process may prompt for parameter entry.
Parameters are defined as name-value pairs, where the name must be unique in the scope of the parameter. Refer to Appendix A, Dynamic Parameters for further information.
If we need a different range of data to be loaded each time, then changing the ranges values in the DataSource Wizard will be a time consuming process. Dynamic parameters can be specified for the Range in the DataSource Wizard and the values are obtained when the DataSource is used.
The file EmpDet.xls consists of employee details in two worksheets as shown in Figure 5.11, “EmpDet.xls”.
If you want to fetch the values in all the sheets of the Excel file using different range values, here's the process:
Before adding an Excel DataSource, the ranges must be defined in the Excel file.
Open the EmpDet.xls file.
Select Name -> Define under the Insert menu. The Define Name dialog box pops up.
Enter name as Emp1_Small and enter range as given below in the "Refers to:" text box and click the Add button.
=Sheet1!$A$1:$D$6
Enter name as Emp1_All and the range as given below in the "Refers to:" text box and click the Add button.
=Sheet1!A$1:D$11
Enter name as Emp2 and the range as given below in the "Refers to:" text box and click the Add button.
=Sheet2!$A$1:$D$3
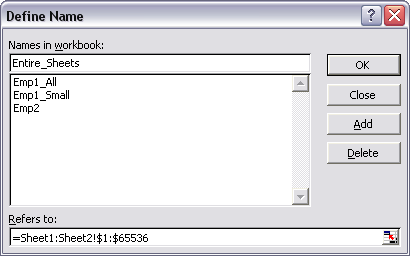
Enter name as Entire_Sheets and the range as given below in the "Refers to:" text box and click the Add button. After adding the columns the dialog window appears as shown in Figure 5.12, “Define Name”. Click the Ok button in the Define Name dialog window.
=Sheet1:Sheet2!A$1:D$11
Save the EmpDet.xls file.
Launch Elixir Repertoire.
Using the filesystem or folder popup menu, select Add -> DataSource.
The DataSource Wizard appears. Select Excel DataSource and click on the Next button.
The Define Excel DataSource screen appears. Enter name as Excel-3.
Enter the EmpDet.xls URL in field provided. Alternatively, by clicking the button on the right of the text field, select the EmpDet.xls file from the Open dialog.
Enter ${Range} in the Range field.
Select the First Row Header check box and click on the Next button.
In the screen that appears click on the Infer Schema button. Enter any range specified above in the Dynamic Parameters dialog box that appears and click the Finish button. The schema will be inferred. Change the Data Type of Emp_Id and Emp_Sal to Integer. Finally, click on the Finish button.Figure 5.13, “Completed DataSource Wizard”.
Click the Finish button in the DataSource Wizard.
The Excel data source is added to the repository. Double click on Excel-3.ds. Click the Load Data menu.
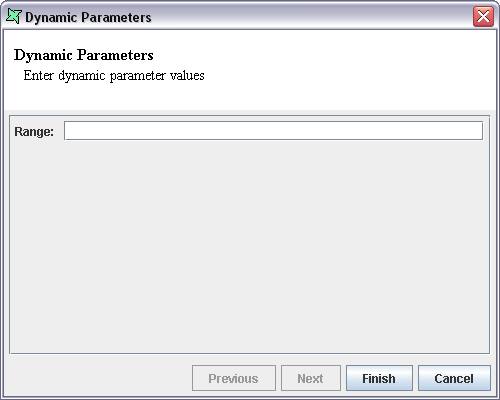
The Dynamic parameter dialog box pops up as shown in Figure 5.14, “Dynamic Parameters”. Enter one of the range names previously defined (Emp1_Small, Emp1_All etc.). Click the Finish button.
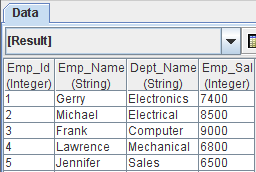
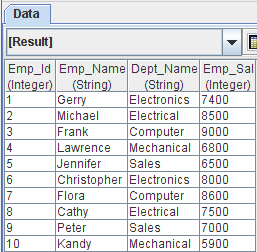
The Emp1_Small range is used to fetch only selected part of the data from sheet1 of the Excel file as shown in Figure 5.15, “Emp1_Small Result”. The Emp1_All range is used to fetch all the data in Excel file sheet1 as shown in Figure 5.16, “Emp1_All Result”. Similarly, the Emp2 range is used to fetch only selected part of the data from sheet2 of the Excel file and the Entire_Sheets range are used to fetch all the records from both the sheets.