In this case study, we will be showing the user the steps to execute in order to have a customized HTML page for user to enter the parameter(s) when rendering a report.
- Create a report template that requires the use of parameter(s). It is not necessary that the parameter(s) require the use of user input. In this case study, we will choose to have the user to enter the values for the parameters. This will show that the values entered will overwrite the default values defined in the report template.
- In /ElixirSamples/Report/Components/Parameters.rml, the default values defined can be seen in the Report tab, Parameters panel. We will be using this report template in this case study.
- Create a HTML file with the same name as the report template and place it in the same folder where the report template is saved. In this case, the HTML page will be named as Parameters.rml.html.
-
In the HTML file, enter the following:
<html> <head><title>Custom Parameter Entry Page</title></head> <body> <h1>Custom Parameter Entry Page</h1> <form method="get" action="/report/ElixirSamples/Report/ Components/Parameters.rml?mode=parameters"> <table cellspacing="2" cellpadding="2" border="0"> <tr> <td align="right">Date</td> <td><input type="text" name="Date"></td> </tr> <tr> <td align="right">Password</td> <td><input type="password" name="Password"/></td> </tr> <tr> <td align="right">Text</td> <td><input type="text" name="Text"></td> </tr> <tr> <td align="right">Choice</td> <td><input type="text" name="Choice"></td> </tr> <tr> <td align="right"></td> <td><input type="submit" value="Submit"></td> <input type="hidden" name="mime-type" value="application/pdf"/> </tr> </table> </form> </body> </html> - This will allow the user to enter the parameters. If the user do not want the end-user to enter text for a particular parameter, the user can edit accordingly the HTML file to do that. In this case study, we will be rendering the report into PDF. This can be changed as well.
-
Go to the Web Interface. Under
AdministrationthenFileSystems. From there, refresh the filesystem. -
When done, go to
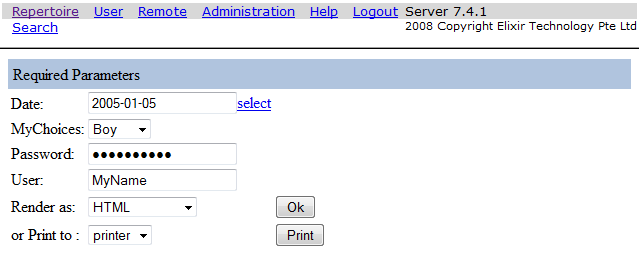
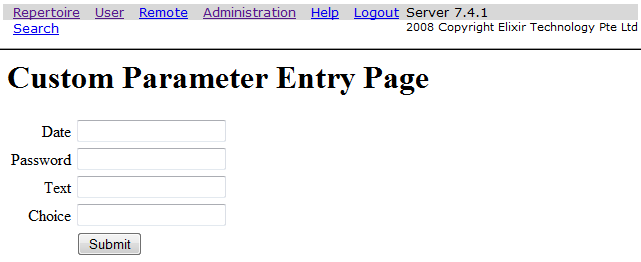
Repertoire, the filesystems available will be listed. In /ElixirSamples/Report/Components, find Parameter.rml. When clicked, end-user will be led to the HTML page created as seen in Figure 6.17, “Parameters Entry Page Customized”. If the parameters entry is not customized, it will look similar to Figure 6.16, “Parameters Entry Page Not Customized”. -
Enter values for the respective parameters. Click on the
Submitbutton. At the bottom of the rendered PDF, the values for the respective fields will be displayed according to the text entered by the end-user. -
If user wishes to use JScript script file or CSS to design the HTML page, simply add the
following lines to the HTML page. The JScript script file and CSS file will have to be in the same
folder as the report template.
<script language="JavaScript" src="JScriptFile.js"
					  type="text/javascript"></script>
<link type="text/css" rel="stylesheet" href="CSSFile.css" />