The JDBC DataSource Wizard allows a new JDBC DataSource to be created. The wizard is shown in Figure 3.3, “JDBC DataSource Wizard”
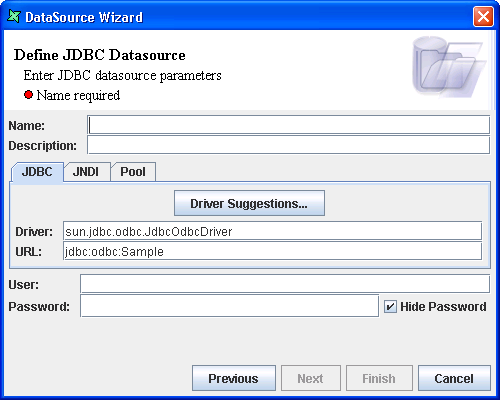
"Define JDBC DataSource" is the first screen of the DataSource wizard. In this screen, JDBC DataSource parameters can be entered.
Name: A unique name to identify the DataSource.
Description: Extra description for the data source.
JDBC connection: Three methods of connection are available: JDBC, JNDI or Pool.
a) JDBC
Driver Suggestions: The type of the JDBC driver can be selected from the Driver Suggestions combo box. A green or red symbol next to each driver indicate whether the driver is available for use. If the specific driver jar file is copied to the ext folder before Elixir Repertoire is launched, a green symbol will appear next to that driver indicating that the driver has been loaded and is available for use. On the Remote Designer, it works slightly differently. Only JDBC drivers that are available (which have green symbols) will be listed.
Driver: When the type of the Driver is selected from the Driver Suggestions combo box the default Driver is automatically entered in the Driver Text box. The Driver class name in the text box can be altered in case your DBMS vendor modifies the class name.
URL: When the type of the Driver is selected from the Driver Suggestions combo box the default URL is automatically entered in the URL Text box. The parameters in the URL text box can be altered according to your JDBC vendor's requirements.
b) JNDI
Context Factory: The context factory accepts information about how to create a context, such as a reference, and returns the instance of the context.
Provider URL: Provides the URL of the resource to bind to.
Resource Name: This identifies the resource name, that binds to the data source.
c) Pool
Connection Pool: The connection pool from the Repository that will provide the connection to the database. See the section called “Connection Pools”, later in this chapter, for more details.
User: The user name is entered if required.
Password: The password is entered if required.
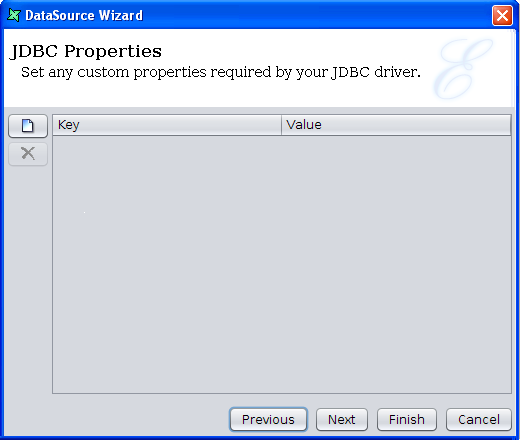
When the data source parameters have been entered, click Next to display the screen as shown in Figure 3.4, “JDBC Properties”. You have the option to set any customized properties specifically for your JDBC driver by setting the keys and values. For more information on how to fill in Key and Value for JDBC custom properties, refer to the section called “Configuring JDBC Properties”.
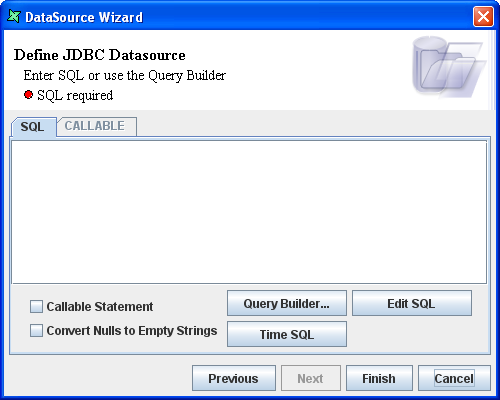
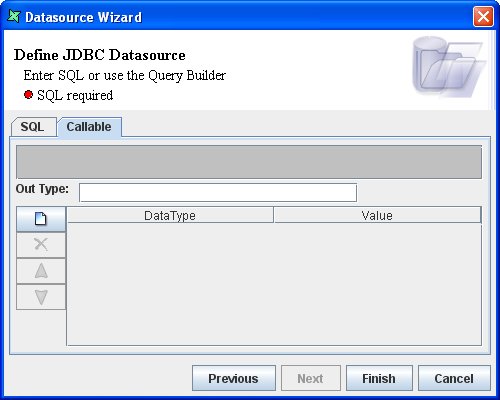
When the JDBC Properties have been entered, click Next to see the screen as shown in Figure 3.5, “Define JDBC DataSource”. In this window there are two tabbed panes namely the SQL tab and the Callable tab. An SQL Statement can be entered in the SQL editor. Stored procedures can be defined in the Callable tab. The Query Builder button can also be used to build a query using visual tools.
When Time SQL button is clicked, there will be a pop-up
window displaying the number of records retrieved and the
time taken to do so.
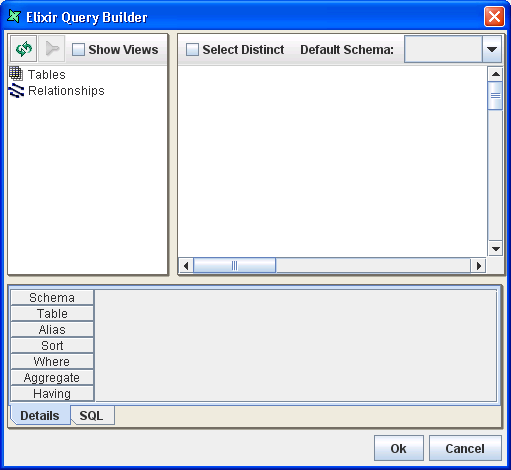
Clicking the Query Builder button in the SQL window, opens the dialog box as shown in Figure 3.6, “Elixir Query Builder”.
There are three panels in this dialog window. The panel on the left side lists the tables and relationships present in the database. There is a Show Views check box present on top of the left panel. When this check box is selected the views present in the database are listed. Tables and Views can be selected to form the basis of the query.
In the right panel, fields of the selected tables and views are displayed. The fields to be included in the query can be selected. When the fields are selected the properties of the selected fields are displayed in the Details tab of the lower panel. Similarly, the field names are included in the SQL statement that is displayed in the SQL tab of the lower panel.
Showbutton is enabled if there are multiple schemas in the database. From there, the user will be able to select specific schemas to be listed under the Query Builder dialog.If the "Select Distinct" check box on the right panel is checked then only distinct records of the table are selected - no duplicate records will be retrieved.
Instead of using the Query Builder to create a SQL statement the SQL statement can be entered directly in the SQL window.
Elixir Data Designer allows stored procedures to be invoked, including passing parameters to the database server (subject to database support). If you need to use a stored procedure, the callable statement syntax has to be entered in the SQL Window. Then the " Callable Statement" checkbox should be selected. On selecting the check box, the Callable tab is activated. In the Callable tab as shown in Figure 3.7, “Callable Tab”, the type of the output parameter must be specified.
Note
If you are using the Remote version of Elixir Repertoire, remember that all data queries and operations are performed by the Elixir Repertoire Server. If you use "localhost" in your connection URL, localhost will refer to the server, not the client. Because all data operations are done on the server, you don't need a client-side version of the JDBC driver.
To add the JDBC driver to your system class path, find the location where Java is installed. This may be either the development kit (jdk), or runtime (jre). For the jdk there is directory jdk/jre/lib/ext, whereas for the jre it is just jre/lib/ext. Put the JDBC driver in this ext directory before launching the Remote tool. This step is only required if you want to use the Query Builder from the Remote tool. The JDBC-ODBC bridge provided by Sun is already included in the Java distribution and doesn't require any additional configuration.
The Query Builder model will be retained after exiting from the wizard.
After entering the SQL or callable statement, click the Next button. The page appears as shown in Figure 3.8, “Define DataSource Schema”.
In this screen the schema can be inferred from the data query. Click the Infer Schema button. If a connection to the database can be made, the inferred fields and their corresponding data types will be listed.
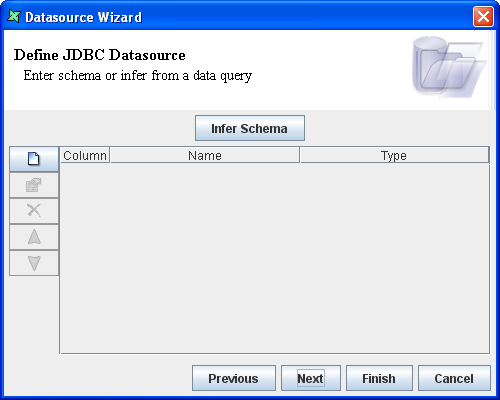
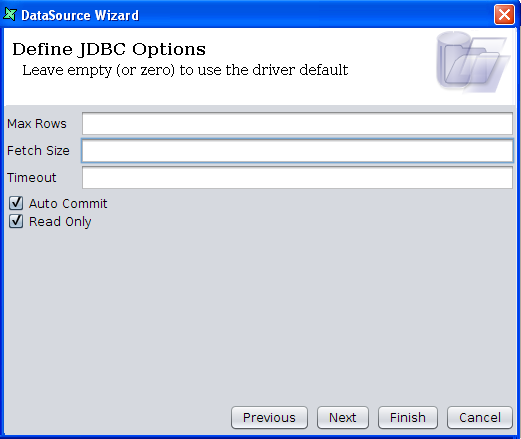
Max Rows: Specify a maximum number of rows, and the datasource will load only these rows.
Fetch Size: Most of JDBC drivers' default fetch size is 10. This value affects the number of network trips to database and hence the application performance.
Timeout: Specify the timeout seconds for loading records from database. If it times out, the loading will be cancelled.
Note
If you intend to use MySQL, the Timeout feature requires that JDBC driver mysql-connector-java-5.1.21-bin.jar (or later) should be placed into /Repertoire/ext/ folder.
Auto Commit: When checked, new record that is added will be updated accordingly.
Read Only: When checked, the datasource will only read from the database once. From then, the datasource will load data based on the data that was first read. Data will be retrieved at a faster speed as the driver assumes that no changes is made to the database.