The different ways of using a Reference DataSource are given below:
In this illustration an Excel DataSource has been added in which a parameter has been specified for the range and the values are expected to be entered during the loading of the Excel file.
Here's how to add a Reference DataSource and use it to supply values automatically to the parameterized Excel data source.
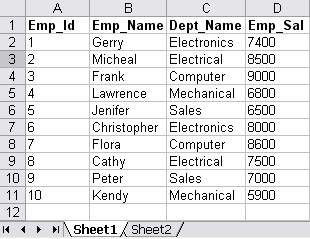
The sample file Empdata.xls consists of employee details in two worksheets as shown in Figure 9.3, “Empdata.xls”.
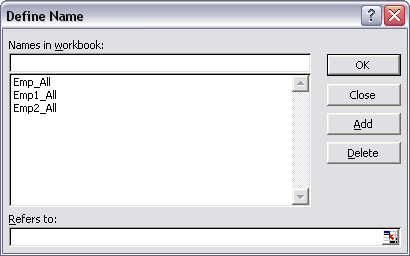
Before adding an Excel DataSource, the ranges must be defined in the Excel file. Open the Empdata.xls file with Microsoft Excel and select Name -> Define under the Insert menu. The Define Name dialog box pops up.
Enter name as Emp1_All and enter range as given below in the "Refers to:" text box and click the Add button.
=Sheet1!A$1:D$11
Enter name as Emp2_All and the range as given below in the "Refers to:" text box and click the Add button.
=Sheet2!A$1:D$6
Enter name as Emp_All and the range as given below in the "Refers to:" text box and click the Add button.
=Sheet1:Sheet2!A$1:D$11
After adding the columns the dialog window appears as shown in Figure 9.4, “Define Name”. Click the Ok button.
Save the Empdata.xls file.
Now move to Elixir Repertoire and create a new Excel DataSource called
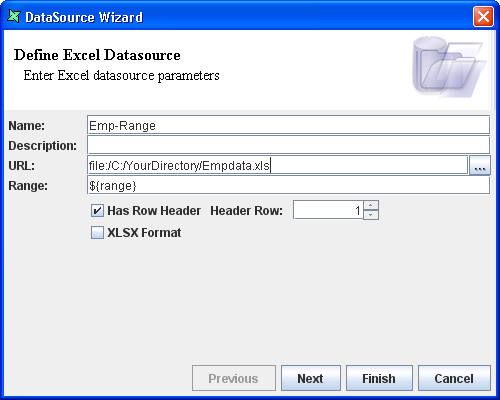
Emp-Range. Enter theEmpdataURL in text field provided or click the button to the right of the text field, to select the Empdata.xls file from the Open dialog window.Enter the Range as ${Range} and select the First Row Header check box. After setting the properties the DataSource Wizard appears as shown in Figure 9.5, “Excel DataSource Sample”. Now click on the Next button. In the screen that appears click on the Infer Schema button. Enter any range specified above in the Dynamic Parameters dialog box that appears and click the Finish button. The schema will be inferred. Change the Data Type of Emp_Id and Emp_Sal to Integer. Finally, click the Finish button.
Click the Finish button to add
Emp-Range.dsto the repository.Choose Add -> DataSource again and this time select Reference DataSource and click the Next button.
In the "Reference a DataSource" screen that appears enter Name as
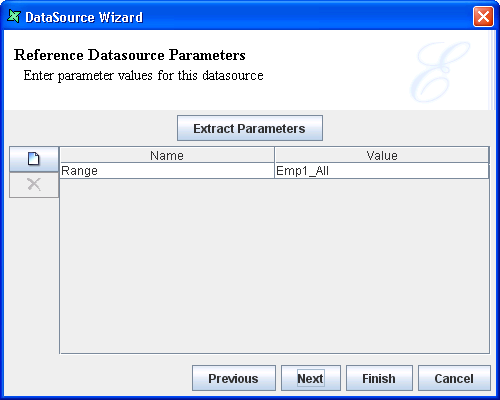
Ref-Ex1and select theEmp-Rangefrom the DataSource combo box. Enter Emp1_All as the value for Range. After entering the values the screen appears as shown in Figure 9.6, “Reference a DataSource”. On clicking the Finish button, the Ref-Ex1.ds is added to the repository.Similarly, add another Reference Datasource called
Ref-Ex2which also referencesEmp-Range. Enter Emp2_All in the Range text field. On clicking the Finish button, the Ref-Ex2.ds is added to the repository.Similarly, add a Reference DataSource called
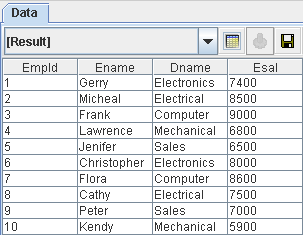
Ref-Ex3as above but enterEmp_Allin the Range text field.Now we have three sample Reference DataSources we can look at how they work. Open the Ref-Ex1 data source. In the data window click on the Load Data menu. The output is displayed as shown in Figure 9.7, “Sample Output”. It is seen that the data from the first sheet of the Excel file is displayed.
Opening Ref-Ex2 and loading the data shows the data from the second sheet of the Excel file is displayed
Repeating the same action on Ref-Ex3 shows the data from both the worksheets of the Excel file is displayed.
Thus all the three Reference DataSources refer to the same Excel file, but parameterize it in different ways. This means there is only one place to define common information, such as the Excel file location, making the solution easier to maintain.
In this example we will work with a text file containing employee details and filter the records with a Composite wrapped with a Reference Datasource.
Add a new Text DataSource called Employee and set the URL to reference the sample Empinfo.txt. Select "First line is header option" check box and select the Access type as Separator Character. Click the next button.
In the screen that appears enter Qualifier as ". Select Semicolon option as the Separator. Click the Infer Schema button. The fields of the text data source are inferred. On clicking the Finish button the text data source is added to the repository.
Now add a Composite DataSource called
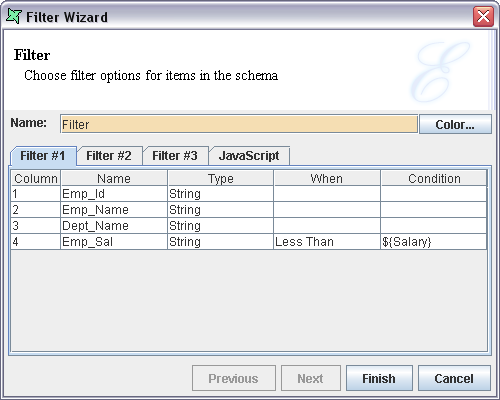
Compo. Drag and drop the Employee.ds from the Repository over the Composite diagram. Add a Filter processor to the diagram and connect it to the Employee datasource.Open the Filter properties and select Filter#1 tab window. In the row corresponding to Emp_Sal field select "Less Than" option from the combo box of When column. Enter condition as ${Salary}. The screen appears as shown in Figure 9.8, “Filter Condition”. Click the Finish button.
Connect the output of the Filter processor to the input of the Result.
Now add a Reference DataSource named
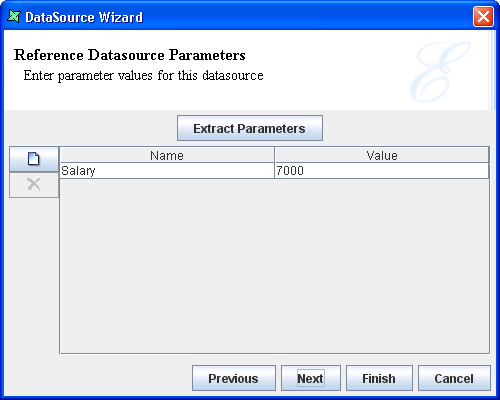
Ref-Com1. Select theCompodata source from the DataSource combo box. Enter 7000 as the value for the Salary parameter. After entering the values the screen appears as shown in Figure 9.9, “Sample Reference”. On clicking the Finish button, the Ref-Com1.ds is added to the repository.Repeat the process to create
Ref-Com2and enter 8000 as the Salary value.Open Ref-Com1.ds and confirm that only the records of employees whose salary is less than 7000 are displayed.
Similarly, open Ref-Com2.ds and check that only the records of employees whose salary is less than 8000 are displayed.
Thus both the Reference DataSources refer to the same Composite DataSource, but parameterize it in different ways.
