There are five pages in the Trigger Wizard.
- Basic Information Page: Defines the name of trigger, location of the job and parameters required.
- Job Schedule Page: Configures the schedule of the trigger.
- Trigger Active Period: The start and stop time of the trigger.
- Trigger Calendar: The Calendar to refer to. (Calendars are discussed in Chapter 4, Calendars)
- Misfire Configuration: Chooses what to do when the trigger does not fire as it is supposed to.
On the first page of the Trigger Wizard you need to enter the name of the trigger
and the location of the job. If the job requires parameters, you will be prompted
to enter them here. In the Parameters table, the rows might
appear in red or blue. Red parameters indicate a value has been supplied that is
no longer required by the job, and it can be safely deleted (it will be ignored anyway).
Blue parameters are required for the job and so appropriate values should be entered.
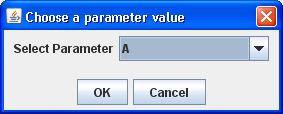
Where parameters provide a list of choices for the user to choose, a
[...] chooser button will be shown. Clicking the button will
show the allowed values (as shown in Figure 3.1, “Choose a Parameter Value”).
On the Job Schedule page of the Trigger Wizard, you can schedule a job to run once only, daily, weekly, monthly, at regular intervals or controlled by a CRON expression.
For weekly events, you need to choose the day(s) of the week when the job should run. For monthly events, you need to choose the day(s) and month(s) to run the job. You can also choose specific day(s) within each month. For jobs that run daily, weekly or monthly, the job will fire at the same time on the scheduled days.
This page of the wizard lets the user configure the absolute time range in which a trigger can fire. The actual firing time itself is governed by the values entered on the previous page - this page only indicates the earliest and latest times that it could possibly fire.
Note
By default, a trigger becomes active upon completion of the wizard and never stops. Also, when the trigger has completed the job run, it will be set to disabled automatically. If user would like to run the job again, the trigger will need to be enabled and make adjustment in Trigger Active Period.
If you need to exclude certain periods from the trigger schedule, such as public holidays, you can mark them on a calendar and point the trigger to the calendar. The trigger will not fire during the period(s) marked in the calendar. The calendar options are discussed in Chapter 4, Calendars.
This page allows the user to choose the action to be taken when a trigger fails to work the way it was supposed to.
Read-Only: When selected, user will only be able to see the settings done for the trigger and all settings cannot be edited.
Hide Details: This option hides all settings done for the trigger.
Encrypted: This option is used with either
Read-Only and/or Hide Details. When this option
is selected together with any of the above option, a password is required to change
the selections in the page.