Table of Contents
Although DocX is a new file format for Word from Microsoft Office 2007, users with Microsoft Office XP and Microsoft Office 2003 can also render a DocX file. To view a DocX file, install the File Compatibility Pack which can be downloaded from Microsoft Download Center, http://www.microsoft.com/downloads/. With OpenOffice, the Compatibility Pack is not required to view.
You cannot create a DocX file using Repertoire Designer or Remote Designer. Therefore, you will need a copy of Microsoft Office to create your template. After the template has been created you can put it in the Elixir Repository so the rendering engine can find it.
Once in the Elixir Repository, you can right-click on the DocX file and select View,
the DocX file will open in Microsoft Office for editing or viewing (assuming you have Microsoft Office installed).
There are markers in the document that indicate the locations of the different bands of the template. In most cases, only the start of a comment and the text associated with the comment is important. For RenderIf, described later, both the start and end of the comment are important.
Some comments have special meanings to them and they are listed in Table 8.1, “Comments”.
Table 8.1. Comments
| Comment | Meaning |
|---|---|
| Section | Indicates the start of data processing. This can be defined by any name. |
| Header |
Presents information about the particular data group being
view. For instance, the group name and a brief description about the
data contained in the group which appears at the beginning of a new
group of record. It has the same concept as Group
Header in Repertoire Designer. This can be defined by
adding the following into the comment:
/Elx/Header |
| Subreport |
Contains data from another report. It has the same concept as a
Subreport element in Repertoire Designer. This can be defined
by adding the following:
/Elx/Subreport |
| RenderIf |
Allows for conditional rendering. It has the same use as RenderIf
in regular RML reports. This can be defined
by adding the following:
/Elx/RenderIf <script>where <script> can be any JavaScript, such as age>=18. If the script evaluates to
true then all the content between the start and end of the comment is included. If
the script evaluates to false then all the content between the start and end of the
comment is skipped. RenderIf scripts should only be used within, not across
report band boundaries like /Elx/Header, /Elx/Detail and /Elx/Footer. If the script
is likely to be long, it is advisable to create a function elsewhere
and reference it, for example:
/Elx/RenderIf testAge(age)instead of putting the full script in the comment. See /Elx/Script/ below for more details on creating longer scripts. |
| Detail |
Contains the main body of the report's data. The detail section
prints individual records and repeat until all records have been
printed. It has the same concept as Detail in
Repertoire Designer. This can be defined by adding the following into
the comment:
/Elx/Detail |
| Footer |
Contains totals or similar information that appears at the end
of each group. It has the same concept as Group Footer
in Repertoire Designer. This can be defined by adding:
/Elx/Footer |
| End |
Refers to the end of the Section. This can be defined by adding
/Elx/End |
Defining datasource file is identical to the idea of adding a datasource in Repertoire Designer and Remote Designer. It can be defined by entering:\n /Elx/DataSource/<SectionName>/Name/<datasourceName>.ds.
For example:
/Elx/Datasource/Section1/Name/FruitSales.ds
This is similar to adding datasource parameter(s) in Repertoire Designer and Remote Designer. It is defined as: /Elx/DataSource/<SectionName>/Parameter/Name/<ParameterValue>.
For example:
/Elx/DataSource/Section1/Parameter/Name/${Company}
Grouping and sorting of data in DocX has the same concept as Group and Sort in Repertoire Designer and Remote Designer. Grouping is done for categorization of data into various logical collections. Sorting is for arranging the data in ascending/descending order. They are defined by: /Elx/DataSource/<SectionName>/Group/<dsFieldName>/<SortOrder>.
An example will be:
/Elx/DataSource/Section1/Group/City/Ascending
Note
There are four different types of sorting available. They areAscending,
Ascending-Lexicographic, Descending and
Descending-Lexicographic. Ascending-Lexicographic and
Descending-Lexicographic are known as Ascending(Simple) and
Descending(Simple) in Repertoire Designer respectively.
A parameter is "declared" when user enters a string like ${parameterName} within a DocX report. A parameter is "defined" when a value is supplied. A report may have multiple declarations and mixed with normal text. For example:
My name is ${first} ${last}.
There are 2 ways of defining parameters.
Define Parameter Individually - Defining each parameter one by one in the DocX report. (It can be defined as: /Elx/Parameter/<ParameterName>/Value)
For example:
/Elx/Parameter/Text/${User##MyName}Load Properties File - All parameters declared are to be placed in a Properties file together with the desired elements defined. It can be defined as: /Elx/ParameterFile/<PropertiesFileName>.properties
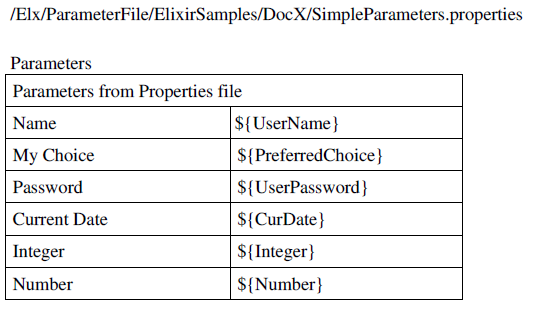
The parameters should follow the following format: <ParameterName>=Value For example:
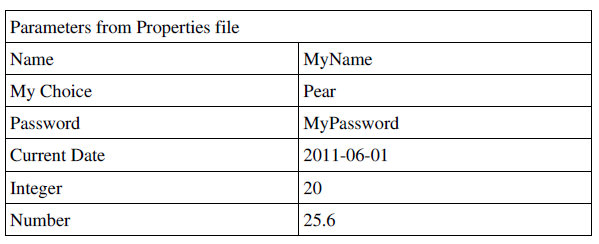
Password=${Password#password#MyPassword}
Name=${User##MyName}
PreferredChoice=${MyChoice#choice(Apple,Orange,Pear)#Pear}
Date=${Date#date#2011-06-01}
Integer=${Integer#integer#20}
Number=${Number#number#25.6}
The following, Figure 8.1, “Parameters in DocX Report”, is how a DocX report will look with the parameters declared and using a Properties file. When rendered, the outcome will be as seen in Figure 8.2, “Rendered DocX Report”. For more information about rendering a DocX report, refer to the section called “Render DocX Report” at the end of this chapter.
Each parameter can have up to three elements: name, type and default value. These elements are separated by the character, #, which can be omitted when there are no subsequent elements. Here are some examples:
- ${name} - This syntax is used to specify a parameter name.
- ${name#type} - This syntax is used to specify the name and type of dynamic parameter.
- ${name#type#value} - This is used to specify the name, type and value.
- ${name##value} - This syntax is used to specify simply the name and value.
Like the 2 ways of declaring parameters, scripts can either be declared individually or by loading a file, a script file.
Define Scripts Individually. (Defined as: /Elx/Script/<Define scripts here>)
For example:
/Elx/Script/function sumFn(a,b){return a+b;}
  var script2=sumFn(2,4);
To use the script in the report, enter ${=script2}.
Load a Script File. (Defined as: /Elx/ScriptFile/<ScriptFileName>.js)
An example of the content in a .js file is:
importScript("ElixirSamples/Reports/Scripting/minusJS.js");
function sumFn(a,b)
  {
    return a+b;
  }
To use the script in the DocX report, enter the following:
${=sumFn(2,4)}
Aliases are used to shorten substitutions in order to fit the available space better. Take the following line for example:
${=elxfn.dateDiff(new java.util.Date(107,0,1),
  new java.util.Date(),'d')}
The result is probably a few integers which will fit in a table cell. However, Microsoft Word will try to show the whole substitution ${=elxfn.dateDiff(new java.util.Date(107,0,1),new java.util.Date(),'d')} in the field, which will alter the layout. Therefore, for report neatness, we use substitution as an alias. (1 is used here, but any name is fine) Instead of a long string, we can use ${@1} instead.
Note
The alteration of layout is only during the designing of DocX report. When rendered, the tables will display according to the height and length of the text.Processing instructions can be temporarily disabled by 2 ways.
Have an additional slash. For example:
/Elx//Datasource/Section1/Name/FruitSales.ds
Use
Hide. For example:/Elx/Hide/Datasource/Section1/Name/FruitSales.ds
Very often, substituted values need to be formatted. For example, a user wishes to show only the hours and minutes of a date, or show thousand separator and two decimal places for calculation results. This is handled by prefixing the substitution with a format string, which always begins with the character, #. This follows the standard Java formatting syntax. The end of the string is marked with the | character.
Table 8.2. Formatting Syntax
| Syntax | |
|---|---|
| Data Field |
${%,.<numOfDecimalPlaces>f|<DataFieldName>} An example will be: ${%,.2f|2000}
|
| Script |
${%,.<numOfDecimalPlaces>f|=<JavascriptHere>} For example: ${%,.2f|=var a=2;var b =4;totalSum=a+b;}
|
| Alias |
/Elx/@/<AliasName>/%,.<numOfDecimalPlaces>f|=<JavascriptHere> For example: /Elx/@/1/%,.2f|=var a=2;var b =4;totalSum=a+b;
|
Note
As Javascript has no integer type, always use %f (floating point) when referring to numbers returned from Javascript. If you refer to %d (decimal integer), an error will occur. To show a floating number as an integer, use %.0. To show a numeric figure such as 12.34, use %.2, which indicates two decimal places.
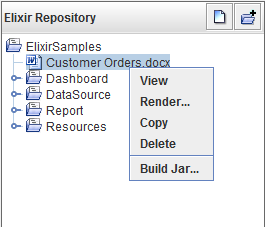
For DocX files in the repository, on right-clicking on a particular
DocX file as seen in Figure 8.3, “Render DocX” and select
Render.... It can be rendered directly into DocX
format with data from the datasource specified in the file.