This case study will do a simple illustration on how to use the
Generate Data action.
- Create a Perspective and give it a unique name.
-
Drag FruitSales.ds (available in /ElixirSamples/DataSource) into the perspective and select
Add Table. Click through the wizard and click onFinishto exit from the wizard. -
The Table element will be created on the perspective. To add an action to
generate data, go to the
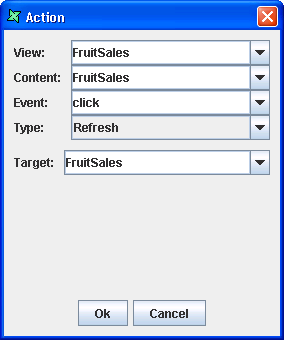
Perspectivetab. At the bottom of the screen, click on theActiontab, then click on theAddicon and the Action Wizard will appear, as shown in Figure 4.1, “Default screen of Action Wizard”. With this action, on double-clicking on FruitSales (the Table element), you will be able to generate the data in FruitSales. -
In the Action Wizard, you can customize the actions you want. In this case study,
for
View, select FruitSales. ForContent, select FruitSales. ForEvent, select doubleClick. ForType, select Generate Data. ForView, select FruitSales. Exit the wizard by clicking on theOkbutton. -
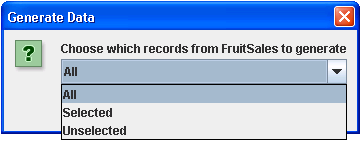
Go to the
Viewtab. Try selecting a few records in FruitSales while holding on the Ctrl key. After selecting, double-click within the Table element and Generate Data Wizard will appear as shown in Figure 4.2, “Generate Data Wizard”.Allwill mean saving all the data in the Table element.Selectedwill mean saving only the selected records in the Table element.Unselectedwill mean saving all the records other than the selected ones. -
Clicking on the
OKbutton will lead you to the page for selecting the format you wish to save to, designate the location for saving and the name of the file. Clicking onSavewill generate the file.